

An introduction to @testing-library: Part 2
Now we've had our Testing Library overview let's write some tests!


In An introduction to @testing-library: Part 1 we explored why we test, the benefits of using Testing Library as well as some of its features.
It's about time we started writing some tests so let's get straight into in 👏.
Content
- Test setup
- Our starter component
- Testing
- Async component update
- Conclusion
Want to practice some queries - Testing Playground
1.) Test setup
For the following example I will be using Testing Library in combination with the testing framework Jest and we will be unit testing a simple stateful component in React. I will also be using Yarn as my preferred package manager.
I have begun by creating a new project with create-react-app. The great thing about this is that the packages that we need to get started with are automatically installed for us in the build.
If that wasn't enough create-react-app also comes with support for Jest out of the box meaning we can get straight into writing our component for testing 👏.
The following are the Testing Library packages that we will be using included with create-react-app👇.
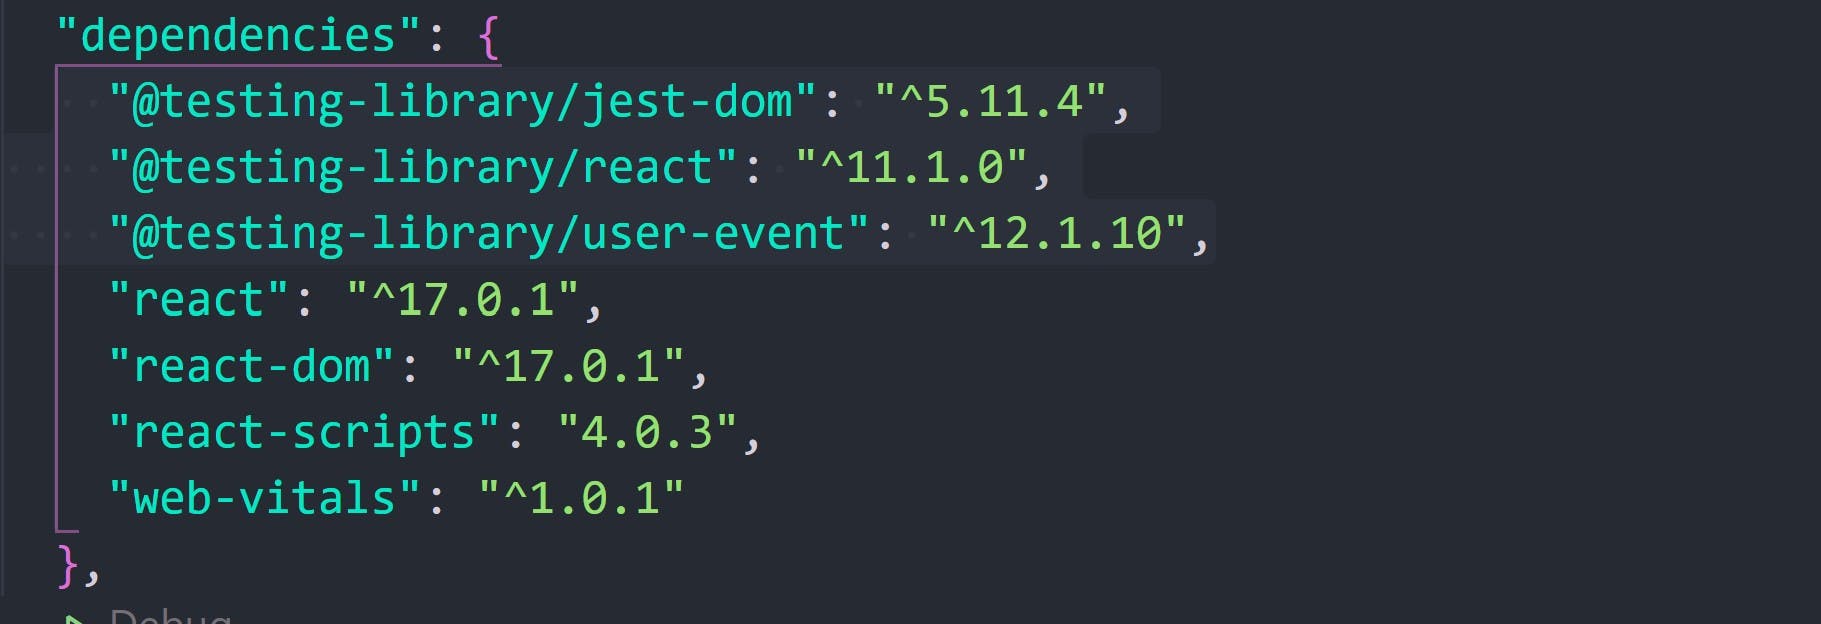
@testing-library/jest-domprovides us some custom Jest matchers which we will soon see@testing-library/reactgives us api's so we can work with React components@testing-library/user-eventallows us to perform user related actions like firing events
If you spin up your own create-react-app you will see these packages in your dependencies as well as a setupTests.js file inside the src folder. Inside setupTests.js we import @testing-library/jest-dom. React will run this file before each of our test files meaning it is imported once here and we won't have to keep importing it into every test file.
I'm going to start by creating two folders to store our components (components) and our tests (__tests__). The reason we name the tests file with two underscores on each side is because Jest will recognize this file and run the tests inside for us when we run the script yarn test.
You could also store your tests in the same location as its component counterpart but for this example we'll keep them separate.
To see this in action I will delete the App.test.js file provided by React and create a new test file for our component named UserInput.test.js inside our __tests__ folder and run the test script again. You should see that Jest runs our new test file before giving us a FAIL.
We need a component to test. So let's build one!
2.) Our starter component
Next I'm going to show you the component we will be working with in our examples. All I have done is created the component and imported it into the default App component after removing the starting code that create-react-app provides.
It is a simple example so that we can focus on Testing Library core features and the flow of testing. This is how it looks 👇.
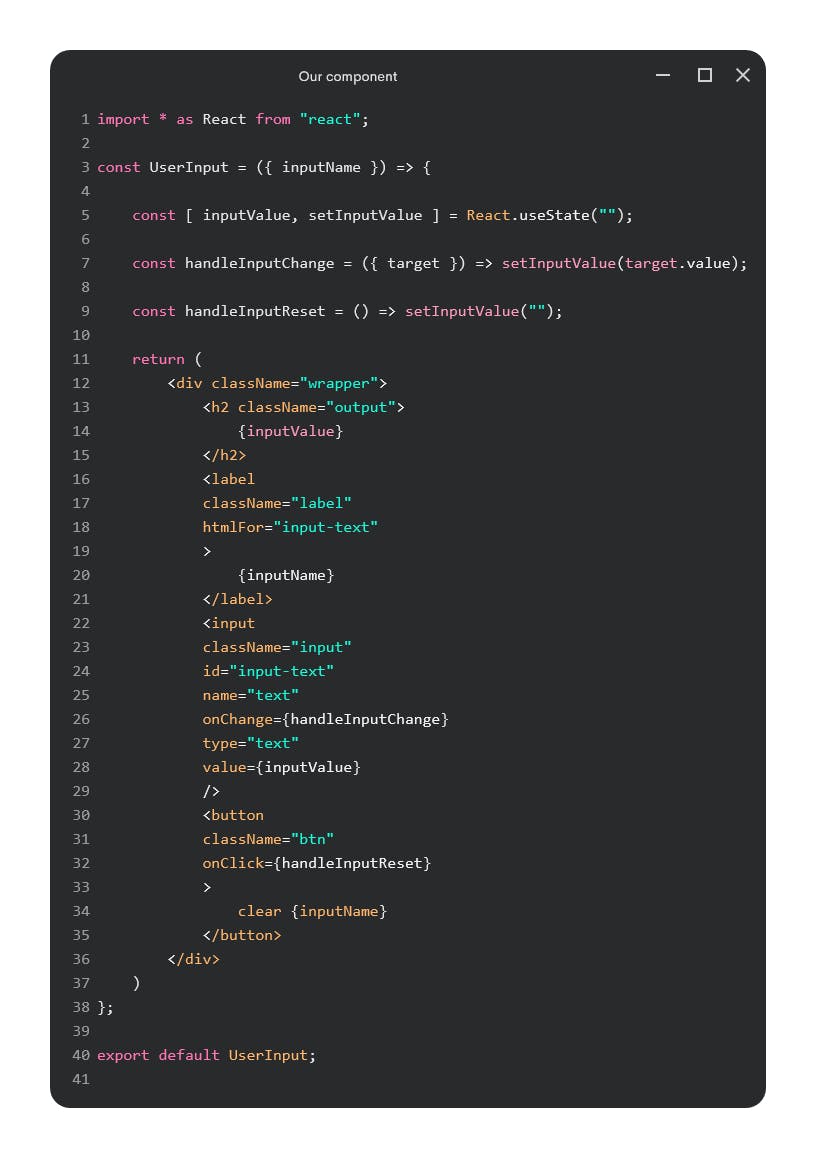
Let me break this down for you. We have a component that has a simple text input that allows users to enter a value into it. We then pass this input value above to a <h2> element.
Pointless I know but it makes for a good example 😅. We also have a reset button that will clear the value in the input field on a click.
We are using a controlled input and therefore we maintain the state of the input value with the useState hook. When the user types into the input we update our input state value using with event.target.value and finally pass this state as the value for our input. Here I am deconstructing target from the event object in the function properties.
We also have a prop called inputType that we pass from the <App /> component. I have given it the value of name so we can ask the user for their name or anything else if we chose to change it. I wanted to include some props for our component so that we can test it.
Below is the <App /> component where we import our component to be tested.

I have also added some simple styling just for you to help visualize our component. This is how it looks in browser 👇.
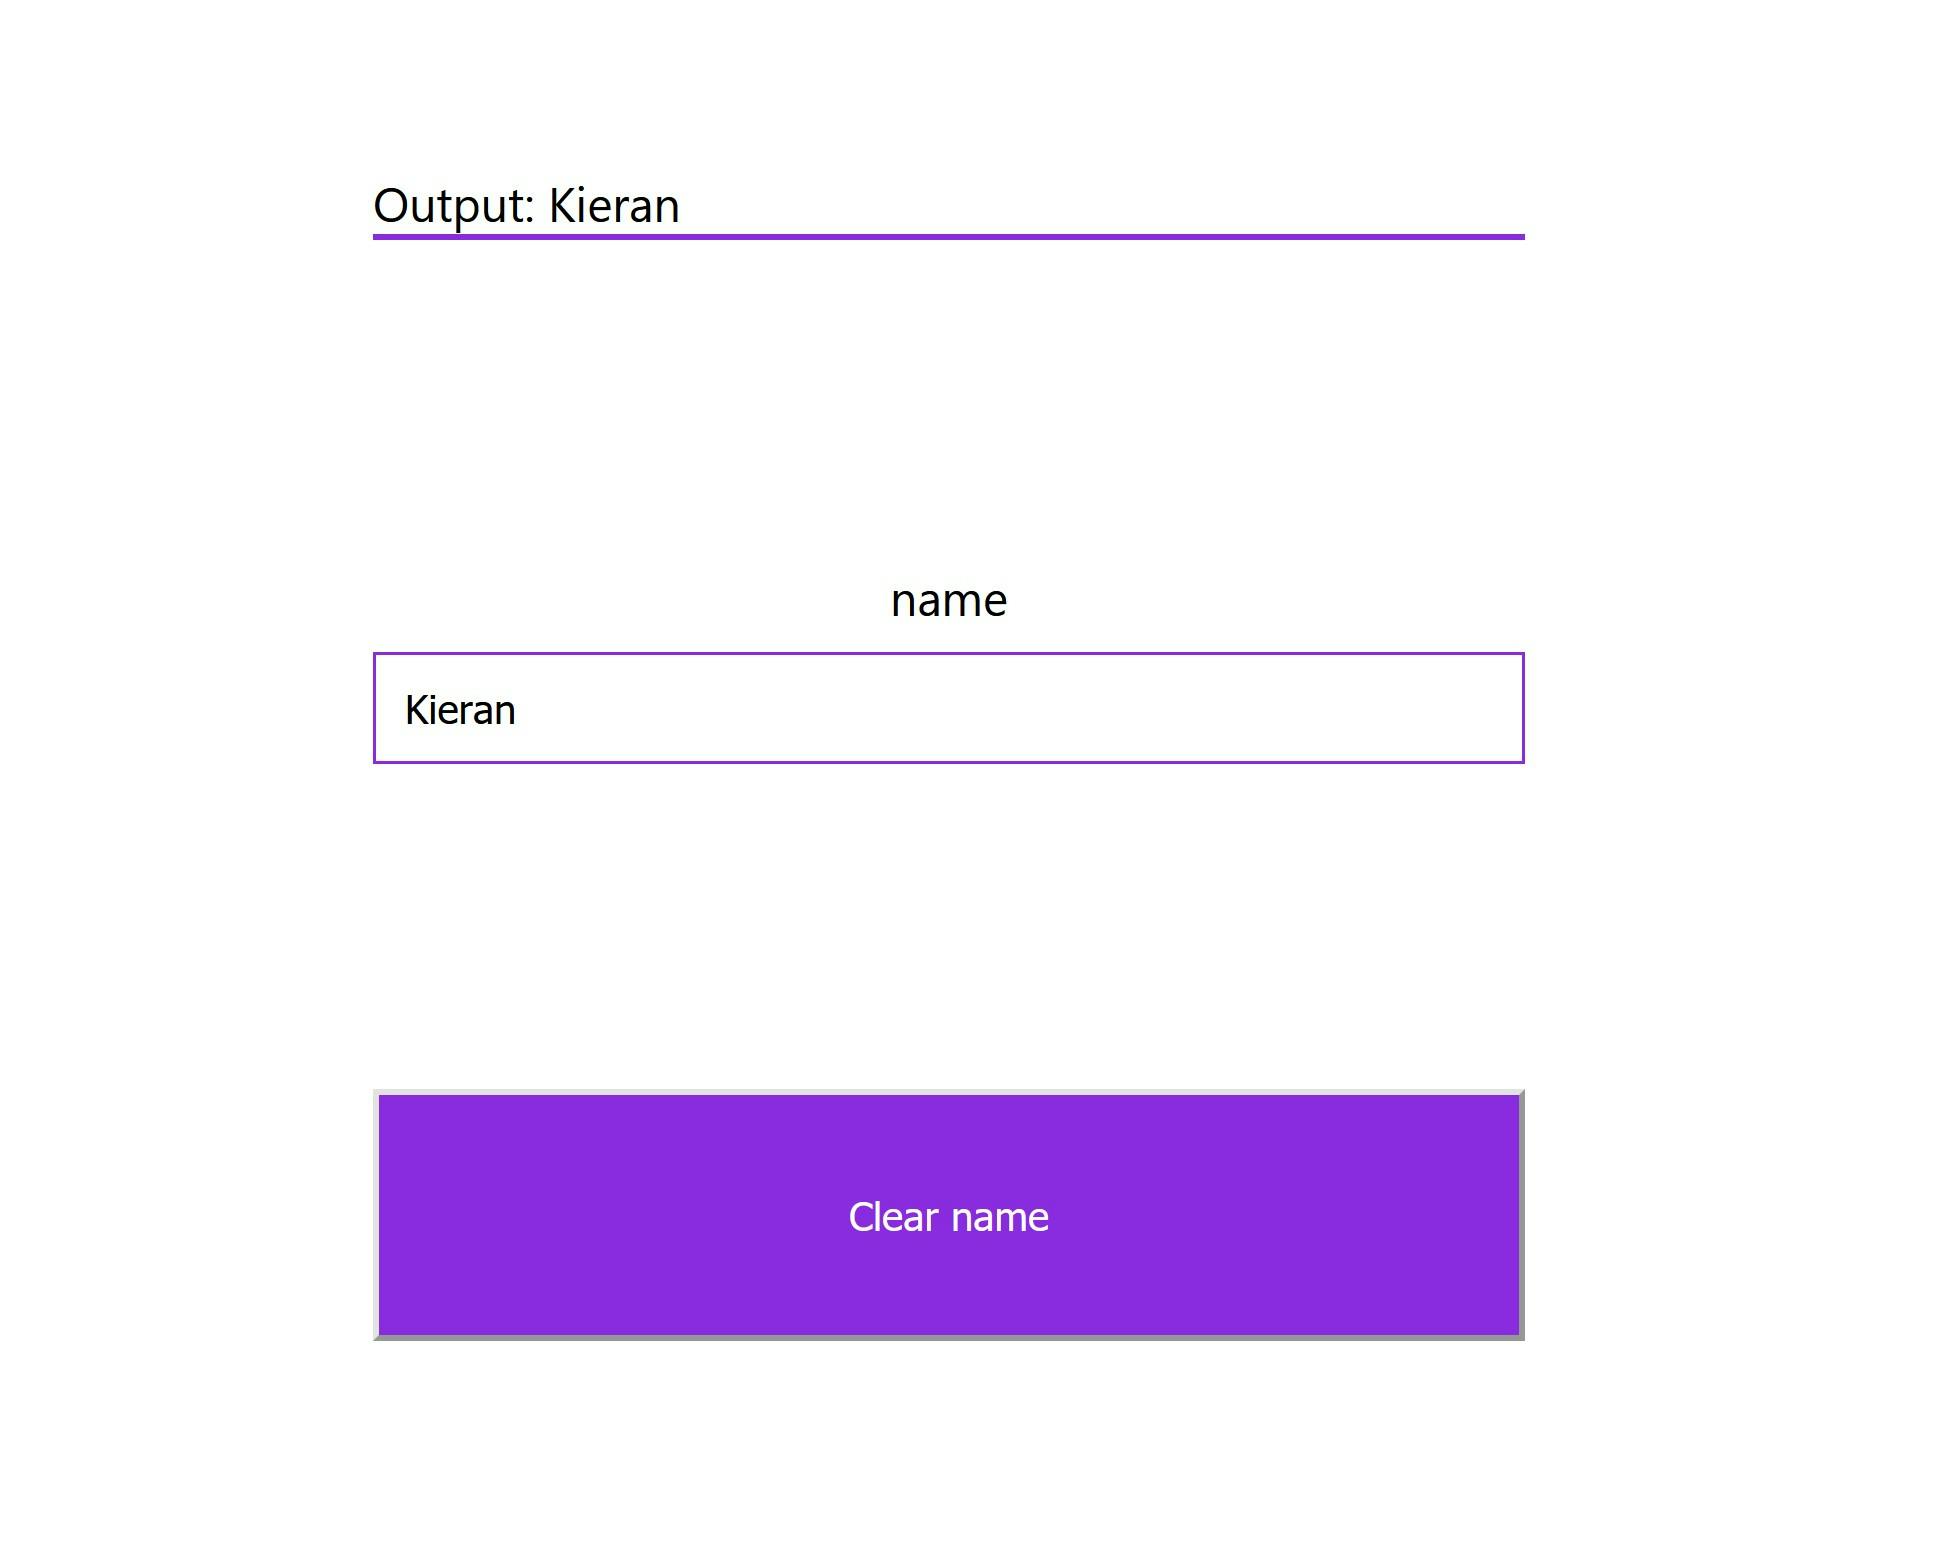
Here we type my name "Kieran" and you can see this is mirrored above in the <h2> element.
Let's start testing 🙌.
3.) Testing
So we want to avoid testing implementation details. This means we should test the results that our users will see and interact with and not necessarily how we do it in case we change how we do it in the future.
Test 1
Our component has a prop as a string and this prop is shown to the user. So let's make sure this is coming through as we expect. Here we go 👇.
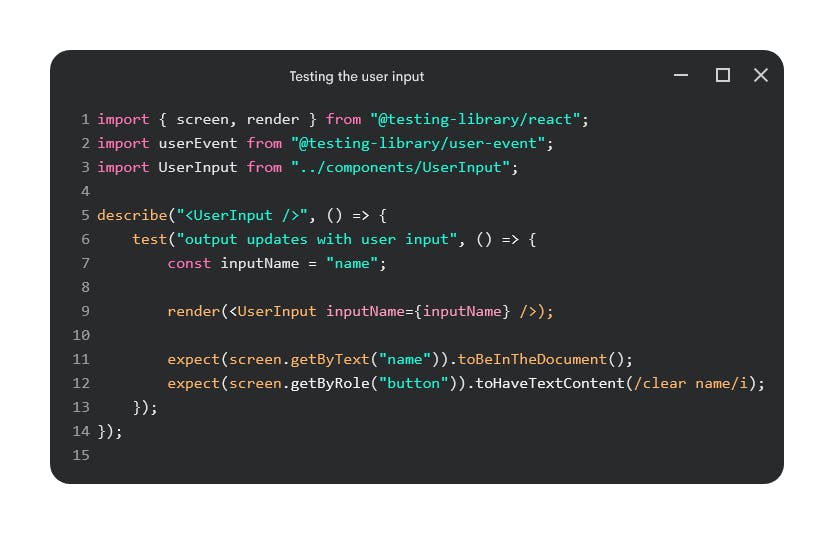
To start we import screen for our queries and the render method to render our component. We will use userEvent a bit later.
Next up we create our describe block that will wrap our tests and then create our first test. This first test will check that the input is working as expected. The describe and test structure is just part of the Jest testing framework.
Next we render our component and we create a mock prop to pass in. When we render our components in unit tests we have to create our props ourselves. Here I pass in a prop called name because we are asking for the users name.
In order to assert that this prop is indeed visible to the user I need to query for it. I start by seeing if I can query it by role with getByRole as an accessible query which in this case is not possible. You can use this list of roles to help you MDN - Using ARIA: Roles, states, and properties.
Querying for elements is an important part of using Testing Library. If you would like some practice with this there is a great tool called Testing Playground where you can quickly write some elements and queries and receive feedback on whether there are more suitable queries available.
Here the prop is passed as text content to both the label and the clear button. We use the getByText query to check if an exact match for this is present in the DOM and it is in our label which is what we are looking for. If we tried to query for a substring like this 👇
screen.getByText(/name/i); which matches a substring with a case insensitive flag i
it would also return our clear button because it contains the word name. We want an exact match like this to find our label 👇.
screen.getByText("name"); which matches an exact string.
Secondly we query for the button by its accessible role and we use the @testing-library/jest-dom package and its toHaveTextContent() matcher. This matcher asserts that it has the text content clear name which partly comes from our prop. If we had more than one button we could query them using getAllByRole() instead. Now if we run the test it should PASS ✔!
This package has a lot of great matchers that let us assert different states of the DOM. Check it out here testing-library/jest-dom.
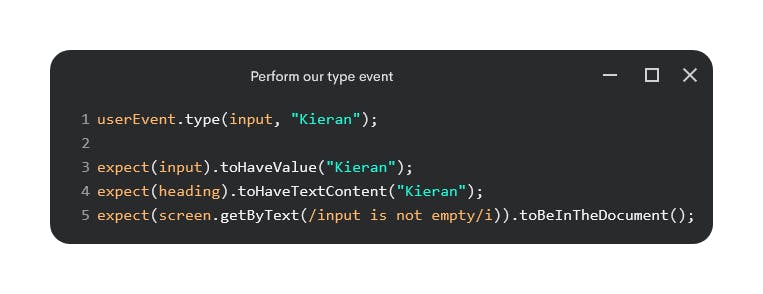
Next up we want to type into the input and check that it updates the UI with the value provided. Check it out 👇.

First we query for the input element and store it in a variable because we will reference it more than once. We query for the text associated with label which in this case is the value of our prop "name".
Then we query for our output which in our case is the heading element <h2>. We can query this using getByRole("heading").
Next we can start using some events. Here we use the type event to simulate our users typing into the input and we assert that the input value contains the value "Kieran" which we expect. I then use another type event to show you that it doesn't replace the previous event. Just like a real input field the string continues as we type and we end up with "KieranRoberts".
Finally we want to check that this is being outputted as we expect. First as the value of the input with toHaveValue() and secondly to the output heading as text with toHaveTextContent().
Great 👏. Now we have our input tested.
Test 2
Next we want to test that our reset button clears our input as the user expects.
For the purpose of this article I will split our component tests into multiple test blocks so it's easy to follow and there's clear separation with our component features.
Out second test block looks like this 👇.
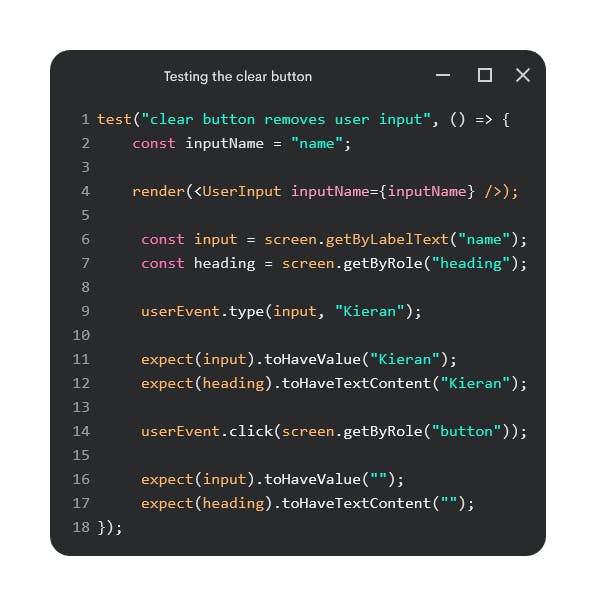
We start very similarly to before by rendering our component and performing a type event into our input. This time we also have a click event that we trigger on our button. We query for the button using the accessible role button. Finally we assert that the value of the input and the text of the heading are empty string.
Great! All the tests pass ✔.

4.) Async component update
Next let's modify our component a little so that we have some async logic to see how we can successfully test this. I will also change up the markup a little so that we can play with some of the other query variations. Check it out 👇.
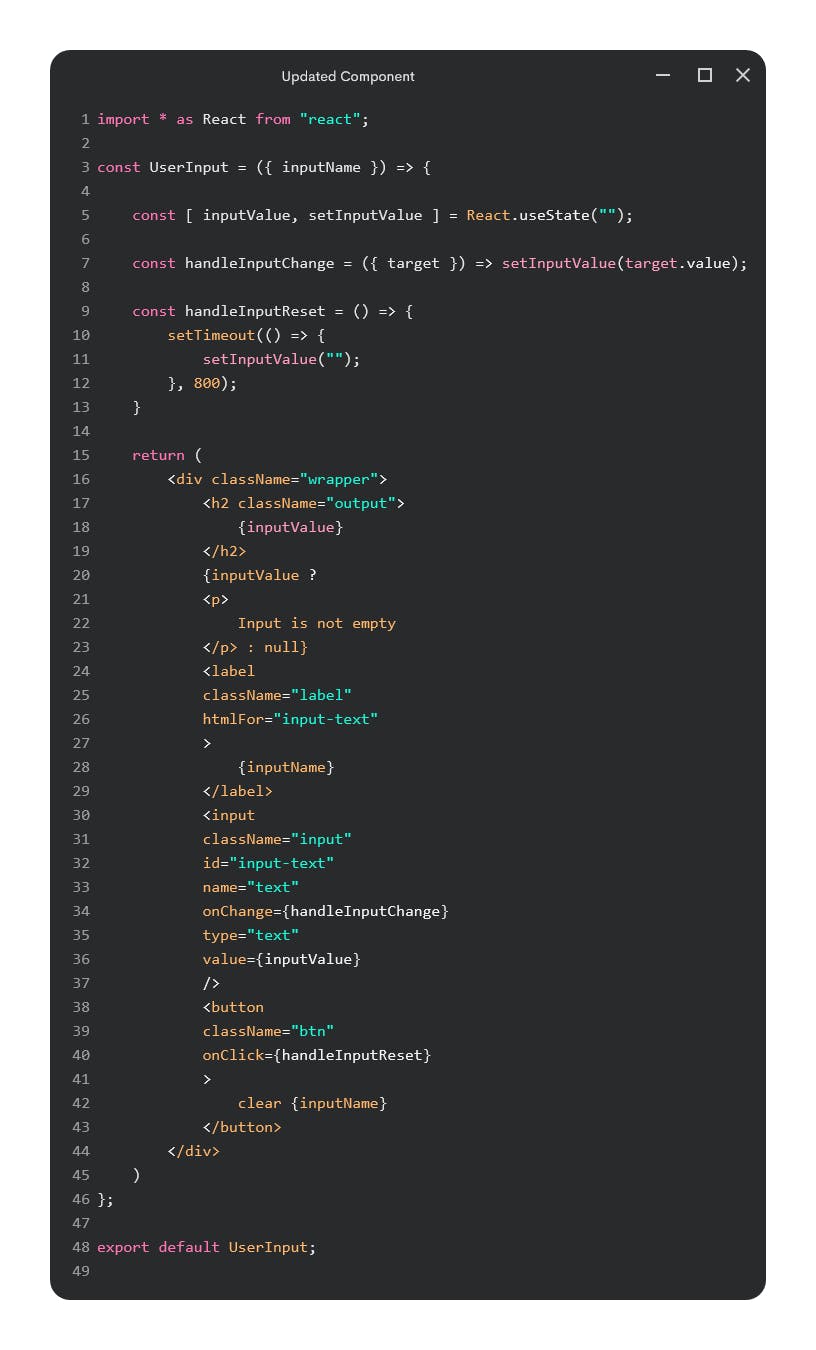
The first change we have made is to add a setTimeout function to our reset button click. This is to simulate an asynchronous submission which is often the case in a real application. Secondly I have included a conditional paragraph element <p> so we can see how we should query for elements we expect don't exist.
Updating our tests
If your familiar with Jest you will know we need to mock our setTimeout function for the testing environment. Let's start here 👇
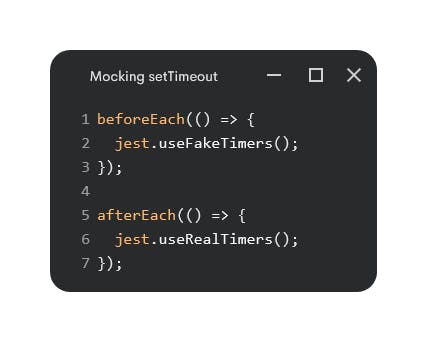
We use to mock jest.useFakeTimers() inside a beforeEach() block which will run the mock before each of our tests. We then simply restore the timer function behavior using the afterEach() block. All of this is just part of the Jest framework.
In our case the first test for the user input remains the same. It's the second test for the input clear that we need to modify.
First of all we now have a conditional element so we want to first assert that this element does not exist in the DOM before we have some user input. We should do this using the queryBy... variation like this 👇.
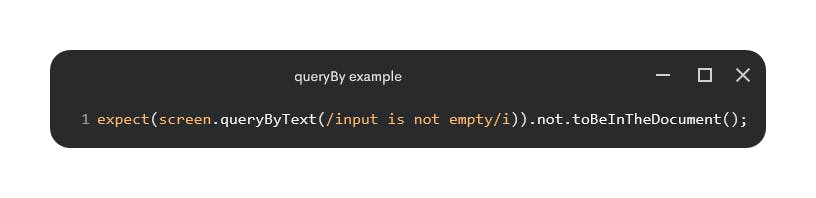
When we want to query an element that we expect does not exist we use queryBy... because it returns null if it does not find a match instead of throwing an error like getBy... would. Our element will have the text "Input is not empty" if it present so we query for this substring with a case insensitive flag i.
To assert our element is not in the document we use the assertion toBeInTheDocument() from @testing-library/jest-dom combined with .not() provided by Jest.
Then we perform our type user event and this time we also assert that our conditional element is now in present.
And now we get to our async submission. Here it is 👇.
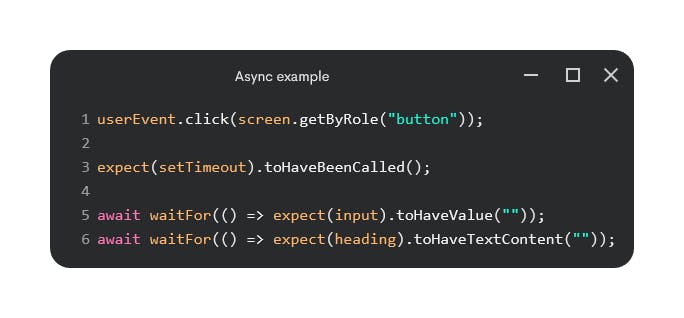
First we click our clear button. Next I make a quick check that our setTimeout mock is called after the click. Now we have to deal with the async part.
When we want to wait some period of time before we make the assertion we can use the waitFor function provided by Testing Library by importing it like this:
import { waitFor } from "testing-library/react";
To this function we pass a callback and we need to await the result of waitFor()because it returns a promise . The default timeout for this is 1000ms meaning our promise should resolve before this otherwise it will reject.
If we did not wrap our assertion this way it would fail because it would run immediately and we currently still have our input value until after 800ms. So instead we waitFor() our result because it calls our callback at different intervals until the promise is resolved. Other than that we still pass in our same assertions.
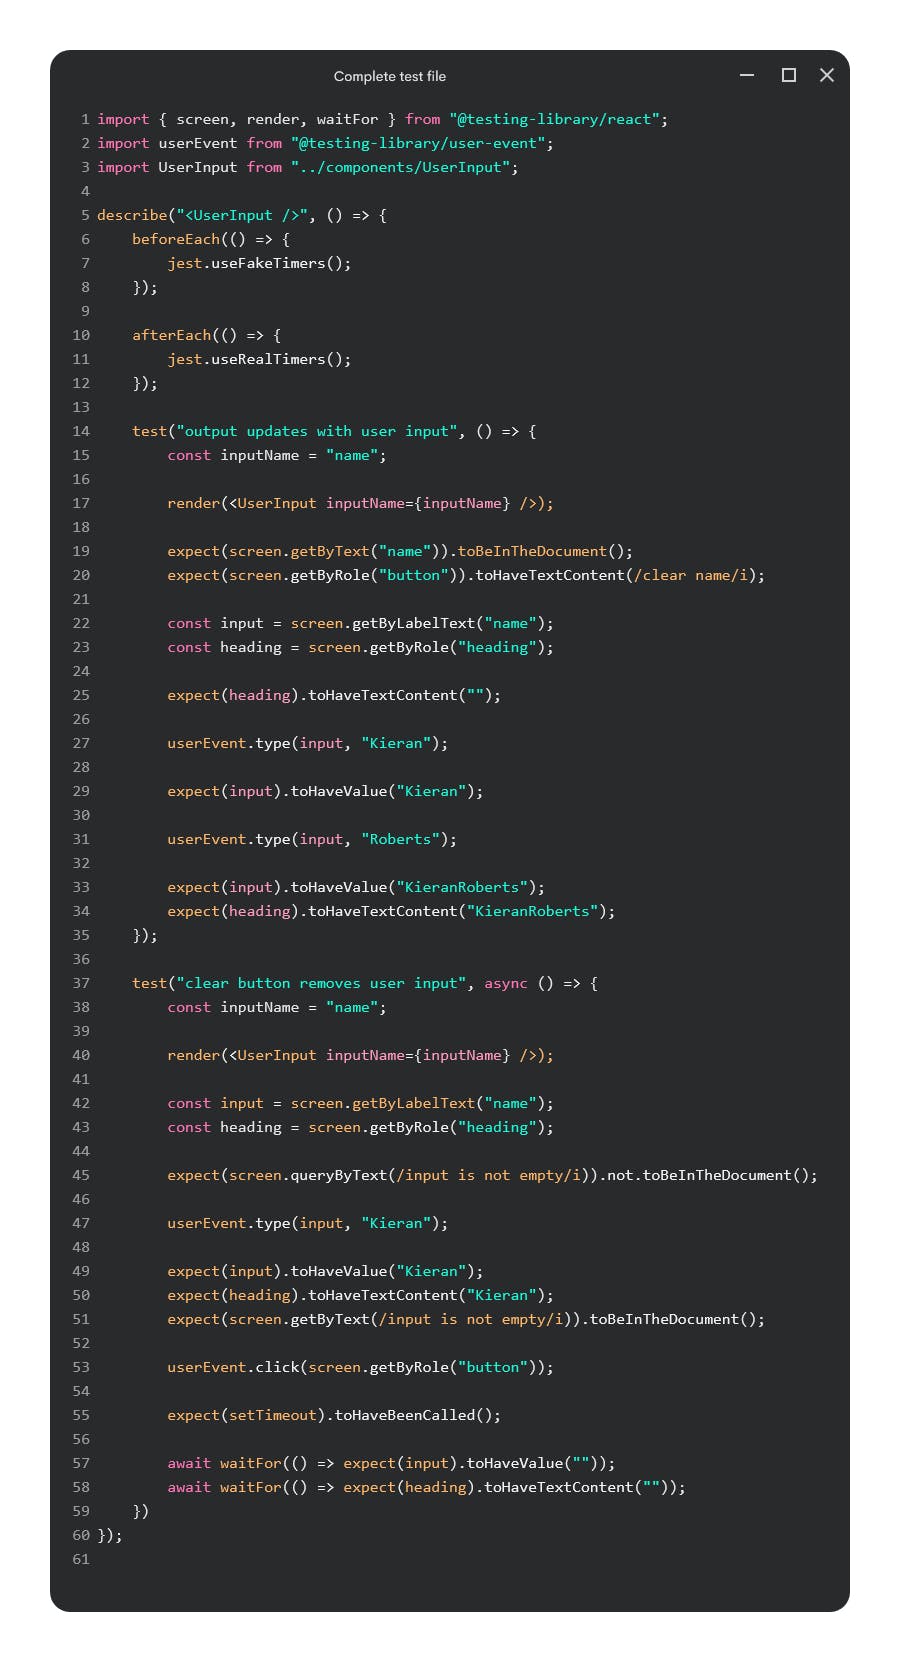
Let's take a look at the completed test file 👏.
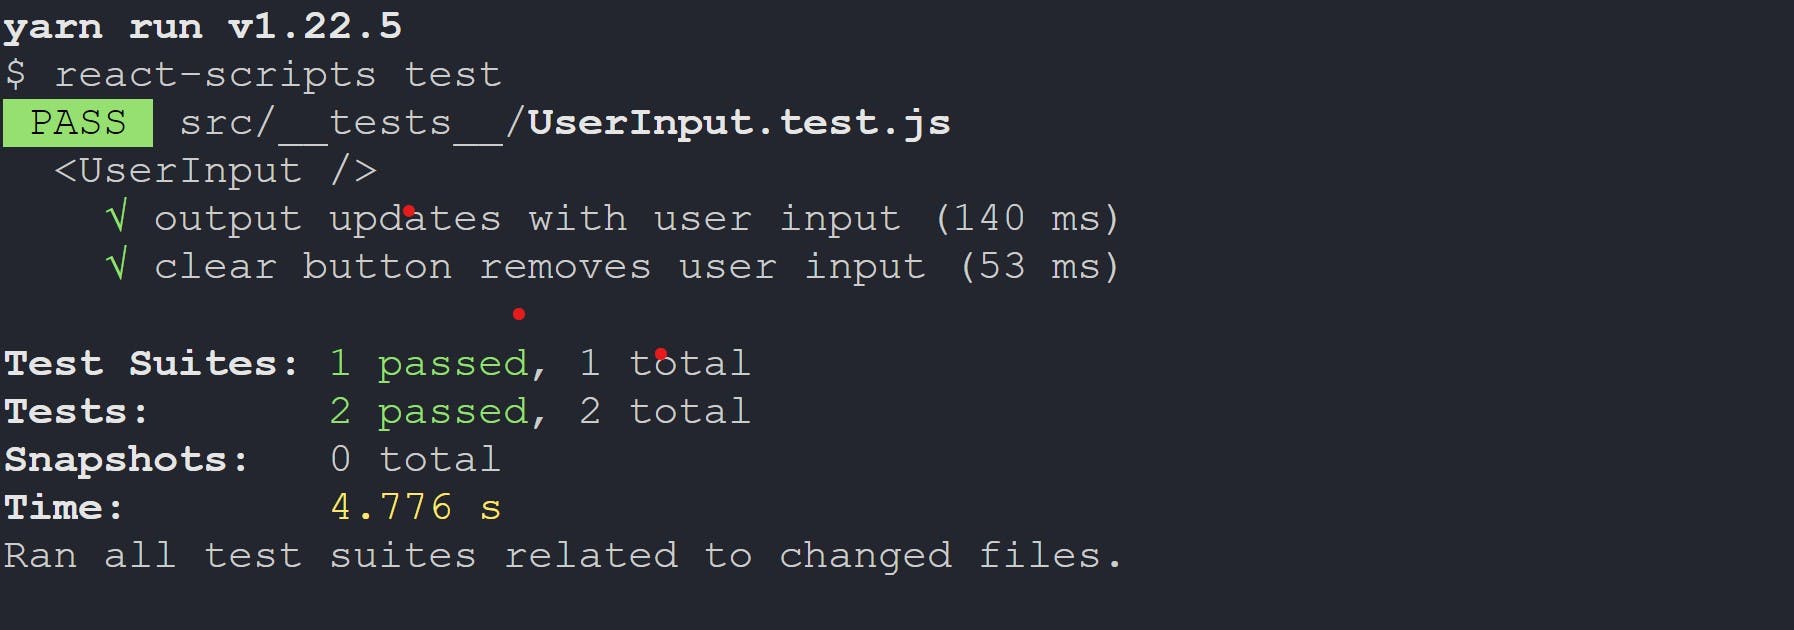
Now when we run our tests we should be greeted by the sweet site of the green PASS ✔.
Waiting on elements
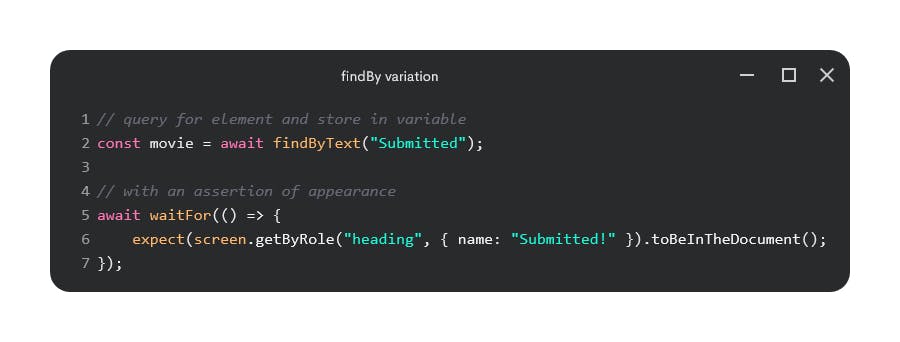
Another common situation that I wanted to mention is when we are waiting on an async event that causes an element to appear that did not previously exist in the DOM. This can be done using the findBy() query variation.
findBy() is a combination of the getBy() variation we have seen and the waitFor() function that we just implemented. It returns a promise that resolves after a default max timeout of 1000ms which means we should await the result.
Consider a situation where we have an async submission for a form and once submitted we add a heading <h2> element to the DOM that says 'Submitted' or maybe we want to store the element in a variable. We could use it like this 👇.
Now we seen some examples of testing some async code as well. Great!
5.) Conclusion
There is still a lot to discover so I encourage you to play around using Testing Library yourselves. I hope you at least learned something from this introduction and I appreciate you taking the time to read the article.
You can find me @Kieran6dev where I'm always active and if you enjoyed the article feel free to let me know. Thanks 👋.