HTTP Security Headers and how to set them in Next.js

Security headers are a type of HTTP header there to help us describe our site so we can help protect it against various potential attacks.
In this article, I will introduce HTTP headers including various different security headers that you might want to use. I will also show you how to implement them in a Next.js application.
Let's go!
Content
What is a security header
First, we need to ask the following question.
What is an HTTP header?
An HTTP (HyperText Transfer Protocol) header is simply something that we use to pass some extra information with HTTP requests and responses. Think of them as notes that give more context to the main document. Each header is simply a key-value pair separated by a colon.
When you visit a website, the server receives a request from the browser. This is a request for more information about the site you are visiting which is exchanged from the HTTP request headers. The server then responds and the response will include HTTP response headers.
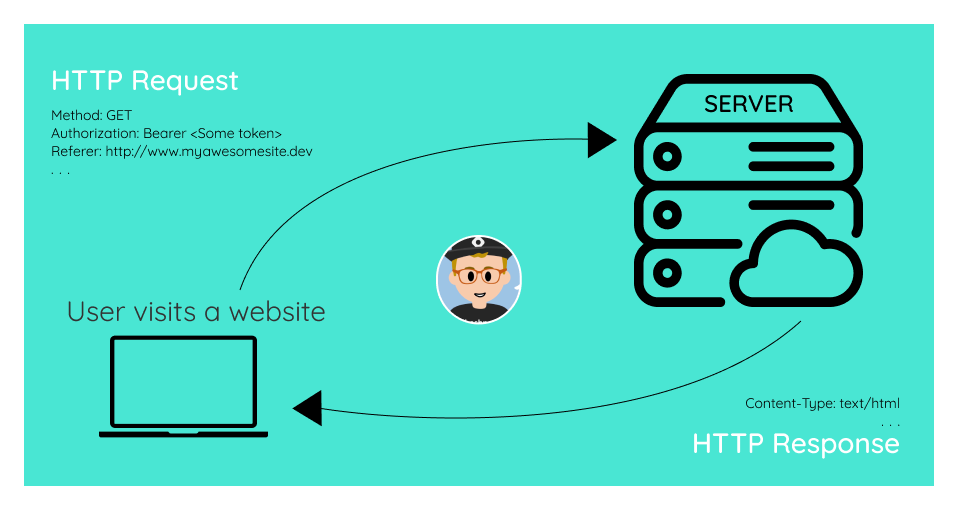
An example of an HTTP header is the 'Authorization' header. It simply authenticates the user agent (software that acts on behalf of the user) with a server.
Authorization: Bearer <Some token>
So what is an HTTP security header?
We use security headers to help describe our sites specifically to protect against various potential attacks. When a user navigates to the site the server will respond with response headers that provide the browser with information on how to handle things.
By adding security headers to the response of our pages, we can minimize the possibility of the following attacks happening to our application.
- Cross-Site Scripting (XXS)
- Clickjacking
- Code injection
Examples of security headers
Let's take a look at some of the important security headers that you may want to implement.
If you're already familiar with security headers, skip ahead to setting them up in Next.js here - Adding security headers to a Next.js app
Content Security Policy
The Content Security Policy header allows you to set a policy for which domains are approved for executable scripts. It's like setting a policy for children in a video streaming service. You can specify what they can and cannot watch and it's the same idea here.
Sometimes your site will need to execute scripts that come from origins other than your own application. With this header, we can fine-tune exactly which domains should be considered safe or 'whitelisted' and which should not.
We can also control the kind of resources we load into the site in more detail. For example, we could restrict loading scripts to our own domain but allow fonts or images to be loaded from a specific outside source.
Let's take a look at a few examples.
To allow content from any domain as if the policy was not set 👇
Content-Security-Policy: default-src *
Or set the own origin as the only trusted domain 👇
Content-Security-Policy: default-src 'self'
You can also specify any other domain other than your own trusted domain 👇
Content-Security-Policy: default-src 'https://someotherdomain.com'
We can fine-tune our content security policy to set separate policies for resources like images, fonts, styles, media, scripts, and more like this 👇
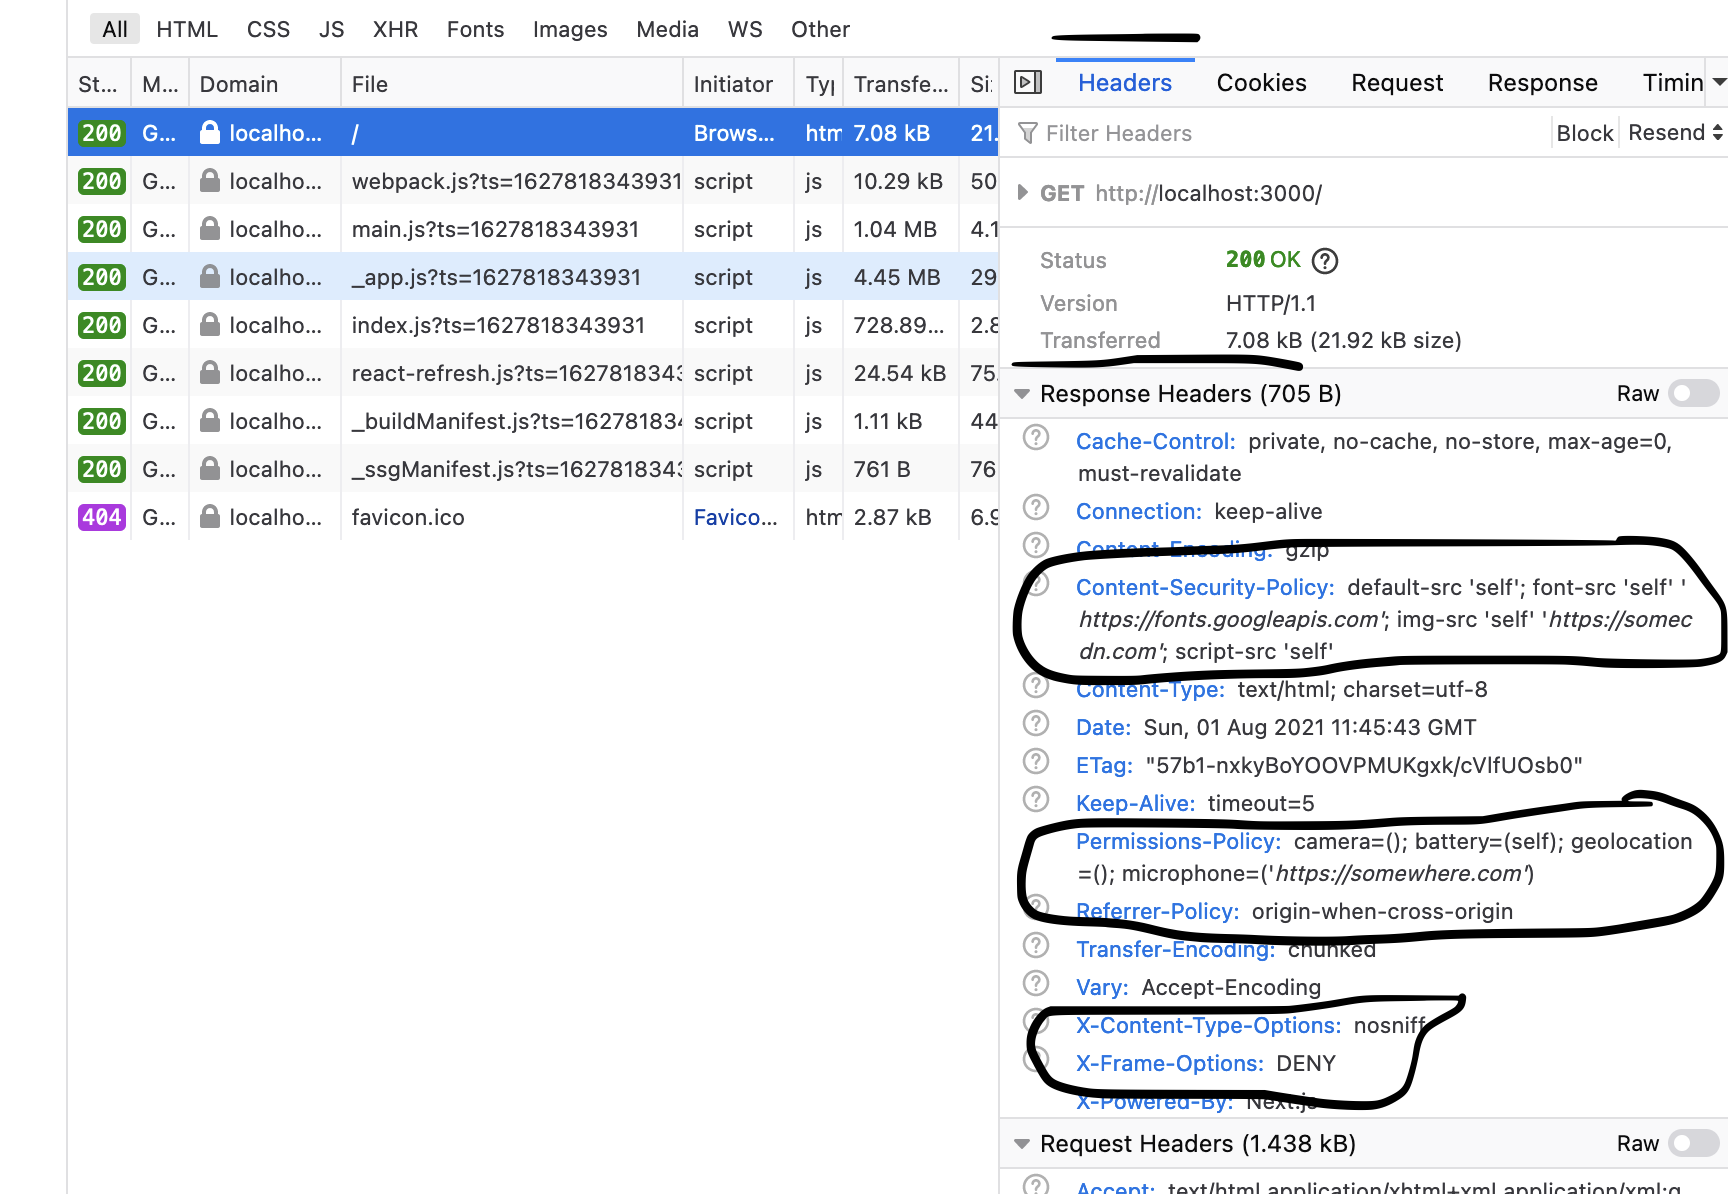
Content-Security-Policy: default-src 'self'; font-src 'self' 'https://fonts.googleapis.com'; image-src *.somewhere.com; script-src 'self'
In the above policy, we set the following
- We set a default source for the content as our site's origin so this will be used for all resources unless otherwise specified.
- We allow fonts to be loaded from our own site or from google fonts
- Images can be trusted from anywhere that ends in
.somewhere.com - Scripts are only trusted from our own site
Permissions Policy (Previously 'Feature Policy')
The recently renamed Permissions Policy security header allows you to control which browser APIs are allowed to be used within your site document or any iframes located in the document.
Things like geolocation, camera, microphone, and many more can all be disabled if you know your site does not require them and hence can reduce the possibility of attacks coming through these avenues as a result.
Permissions-Policy: camera=(); battery=(self); geolocation=(); microphone=('https://somewhere.com')
In the above example, we set the policies of several browser features.
- Camera is empty which means we deny the use of video input devices.
- Battery status API is allowed within your own domain
- Geolocation is empty which means we deny its use
- Audio input devices are allowed for the origin stated
X-Frame-Options
The X-Frame-Options header controls whether or not your site can be loaded within a frame. Allowing this can be dangerous because you leave yourself open to clickjacking attacks.
Clickjacking is an attack that involves tricking the user into clicking something that they believe to be something else. Attackers may disguise elements and the user is unable to see what they are actually clicking on.
We can help protect ourselves against this attack by preventing our site from being loaded within frames.
There are two options for this header
X-Frame-Options: deny
The recommended option is to deny your site being loaded within frames which is shown above using the 'deny' option.
X-Frame-Options: SAMEORIGIN
The 'SAMEORIGIN' option allows the site to be loaded within a frame while serving the site is the same as the one in the frame.
X-Content-Type-Options
The X-Content-Type-Option header ensures that MIME (Multipurpose Internet Mail Extensions) types specified in Content-Type are adhered to and we avoid what is known as 'MIME type sniffing'. Browsers might try and determine the MIME type based on the response content instead of what is specified in the Content-Type header.
It only has one option and it prevents the browser from trying to change the Content-Type away from what was declared.
X-Content-Type-Options: nosniff
Referrer policy
With this header, we can control what information is sent when a user navigates from one origin to another. Consider a user that clicks a link on what we will call the original site. This link takes the user to a different domain. When this happens, some information is sent to the new domain. Information about where the user came from.
There are several different options we can set with this header.
Referrer-Policy: origin-when-cross-origin
The 'origin-when-cross-origin' option sends the path, origin, and query string with a same-origin request from equal protocol levels. An example of an equal protocol level would be from HTTPS to HTTPS.
If the request is cross-origin, only the origin is sent.
Referrer-Policy: strict-origin-when-cross-origin
The 'strict-origin-when-cross-origin' option is similar to the previous option. The path, origin, and query string are included with same-origin requests regardless of protocol level.
When making cross-origin requests, only the origin is sent as long as the protocol level is the same and omits the header otherwise.
Referrer-Policy: strict-origin
With 'strict-origin', only the origin is sent when the protocol level is equal and otherwise omits the header.
Referrer-Policy: no-referrer
The 'no-referrer' setting will omit the referrer header.
There are further options which you can check out here
Strict Transport Security
With the Strict Transport Security header, you can specify that your site should only be accessed using the HTTPS protocol. Here we can specify the time in seconds that the browser will remember this protocol.
Strict-Transport-Security: max-age=31536000;
You can also extend the instruction to all subdomains with an optional setting
Strict-Transport-Security: max-age=31536000; includeSubDomains
You may think that setting up a redirect from 'http://' to 'https://' is enough but attackers could still seize sensitive information. Setting up a strict transport security setting will make this attack far more difficult.
Adding security headers to a Next.js app
Now that we've had a look at some security headers, let's quickly implement them in a Next.js app. Also, feel free to explore some of the other security headers available.
In Next.js we can set security headers from a next.config.js file located at the root of your project.
// next.config.js
module.exports = {
  async headers() {
    return [

    ]
  },
};
We return an array of headers that we specify inside JavaScript objects. You can choose to apply headers that will be sent with every route request or on a route-by-route basis. Let's set some of the headers that we previously explored.
// next.config.js
module.exports = {
  async headers() {
    return [
        {
          source: '/(.*)',
          headers: [
            {
              key: 'Content-Security-Policy',
              value:
                "default-src 'self'; font-src 'self' 'https://fonts.googleapis.com'; img-src 'self' *.somewhere.com; script-src 'self'",
            },
            {
              key: 'X-Frame-Options',
              value: 'DENY',
            },
            {
              key: 'X-Content-Type-Options',
              value: 'nosniff',
            },
            {
              key: 'Referrer-Policy',
              value: 'origin-when-cross-origin',
            },
            {
              key: 'Permissions-Policy',
              value: "camera=(); battery=(self); geolocation=(); microphone=('https://somewhere.com')",
            },
          ],
        },
      ];
  },
};
In the above example, we set our security headers for all routes in our site indicated by the source /(.*). You could also set security headers on a page-by-page basis like this 👇
// next.config.js
module.exports = {
  async headers() {
    return [
        {
          source: '/profile',
          headers: [
            {
              key: 'Content-Security-Policy',
              value:
                "default-src 'self'; font-src 'self' 'https://fonts.googleapis.com'; img-src 'self' *.somewhere.com; script-src 'self'",
            }
          ]
        },
       {
          source: '/blog',
          headers: [
            {
              key: 'Content-Security-Policy',
              value:
                "default-src 'self'",
            }
          ]
        },
      ];
  },
};
Now spin up a development server in your Next.js application and navigate to the route after setting your security headers. You should be able to the headers you set in the network tab of the developer console.
Congratulations, your site is now more secure than it was before! Customize the security headers to suit your application as each site has its own specific requirements.
The end!
That was a look at HTTP security headers and how we can implement them in a Next.js application. I hope you managed to learn something new.
You can follow me @Kieran6dev and if you liked the article, please let me know about it.
Until next time everyone!