

Let's build a serverless Next.js app with Auth0 for authenticating users


Let's explore how we can integrate user authentication in a serverless Next.js app using Auth0 in a really simple way. We will be using a package called @auth0/nextjs-auth0 which was built to support user authentication in Next.js using Auth0 and will get us up and running in no time.
One of my recent side projects was building a full-stack serverless Next.js e-commerce site. This site included user authentication and you may be thinking
How does user authentication work in a serverless Next.js app?
Good question! Let's answer this by building a simple app that allows users to login/logout and visualize their profile data as a result 👏.
Content
- What is the authentication flow?
- Finished app demo
- Building our app!
- Initialize the project
- Auth0 setup
- Auth API route
- Auth Provider
_app.js - Home page
useUser()hook- Nav component
- AuthLink component
- Profile page
- Custom auth helpers
- Conclusion
What is the authentication flow?
Before we start writing any code I think it's important to understand what exactly we are trying to do and how authentication will work.
This article below will give you a fantastic overview of the approaches you can take to implement Auth0 authentication in a Next.js app.
Auth0 - The Ultimate Guide to Next.js Authentication with Auth0
We are going to take the approach of a serverless application where we instead opt to use functions in our Next.js app that provide us with functionality like authentication when it's needed. We can use our serverless functions on a need-to-use basis as opposed to having a server that is constantly running.
Our application login flow will look something like this 👇
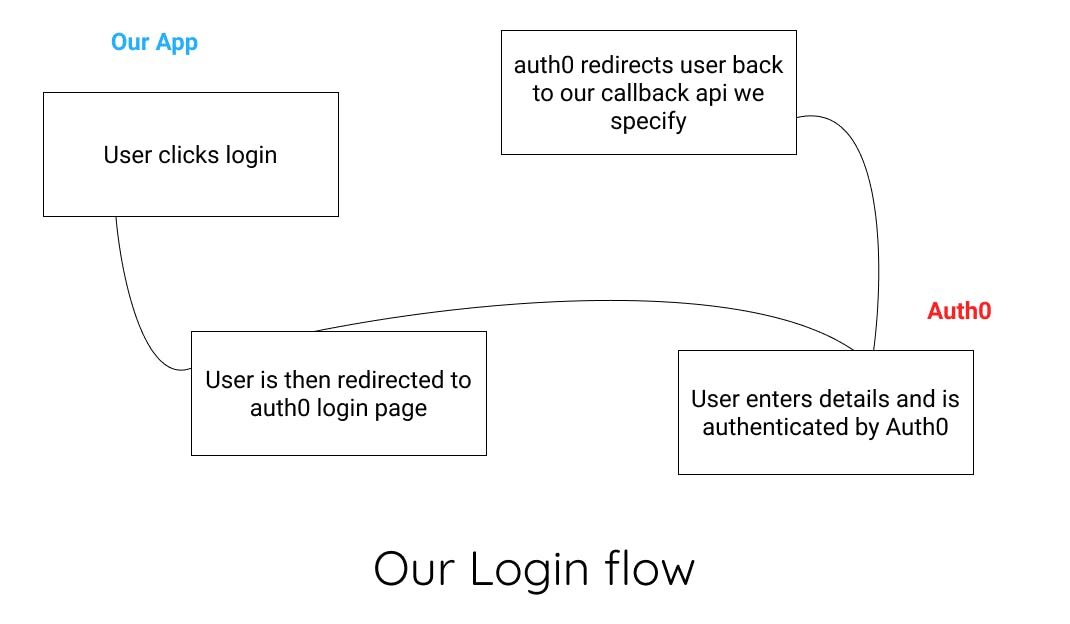
When the unauthenticated user clicks the login button they are redirected to the login form provided by Auth0. Then the user proceeds to login and when successful, is redirected back to our app at a destination of our choosing.
It is important to note that I will not be implementing any kind of persistent storage for users in this tutorial. We have no need for a database in a simple app like this and the authentication works nonetheless. Let me know if you want to see an article on integrating a database into the app 😀.
Finished app demo
I thought it would be a good idea to include a quick demo of the finished app before we start so you can visualize what we are going to be building.
The basic features of the app include:
- Home page that instructs the unauthenticated user to login
- Protected profile page populated with some of the authenticated user's data
- Profile page is a dynamic route
/profile/username - If an unauthenticated user visits profile page, they will be redirected to login page
- Offer logout option for authenticated users
If you want to check out the full repo for this project you can do so here 👇
kieran6roberts/Blog-Next-Auth0
Building our app!
To handle our app's authentication we are going to use a package called @auth0/nextjs-auth0. This package was built to facilitate user authentication with Auth0 in a Next.js app. To use it you must satisfy the following conditions.
- Node.js version ^10.13.0 || >=12.0.0
- Next.js version >=10
Initialize the project
We'll start this project from scratch so you can see exactly what it takes from start to finish. Start by initializing a Next.js app.
npx create-next-app next-auth0
Now install the necessary packages for our app
yarn add @auth0/nextjs-auth0 @emotion/react
@auth0/nextjs-auth0- SDK for handling authentication in our app@emotion/react- Emotion CSS in JS react package for styling
I'll be using Emotion for styling in this app but you can use whatever you want, it's not important, is easily substituted, and there won't be much styling anyway.
Auth0 setup
Before continuing with the code, we first need to set up a new application with Auth0 on their site. You can do so here Sign Up - Auth0 or simply login if you already have an account.
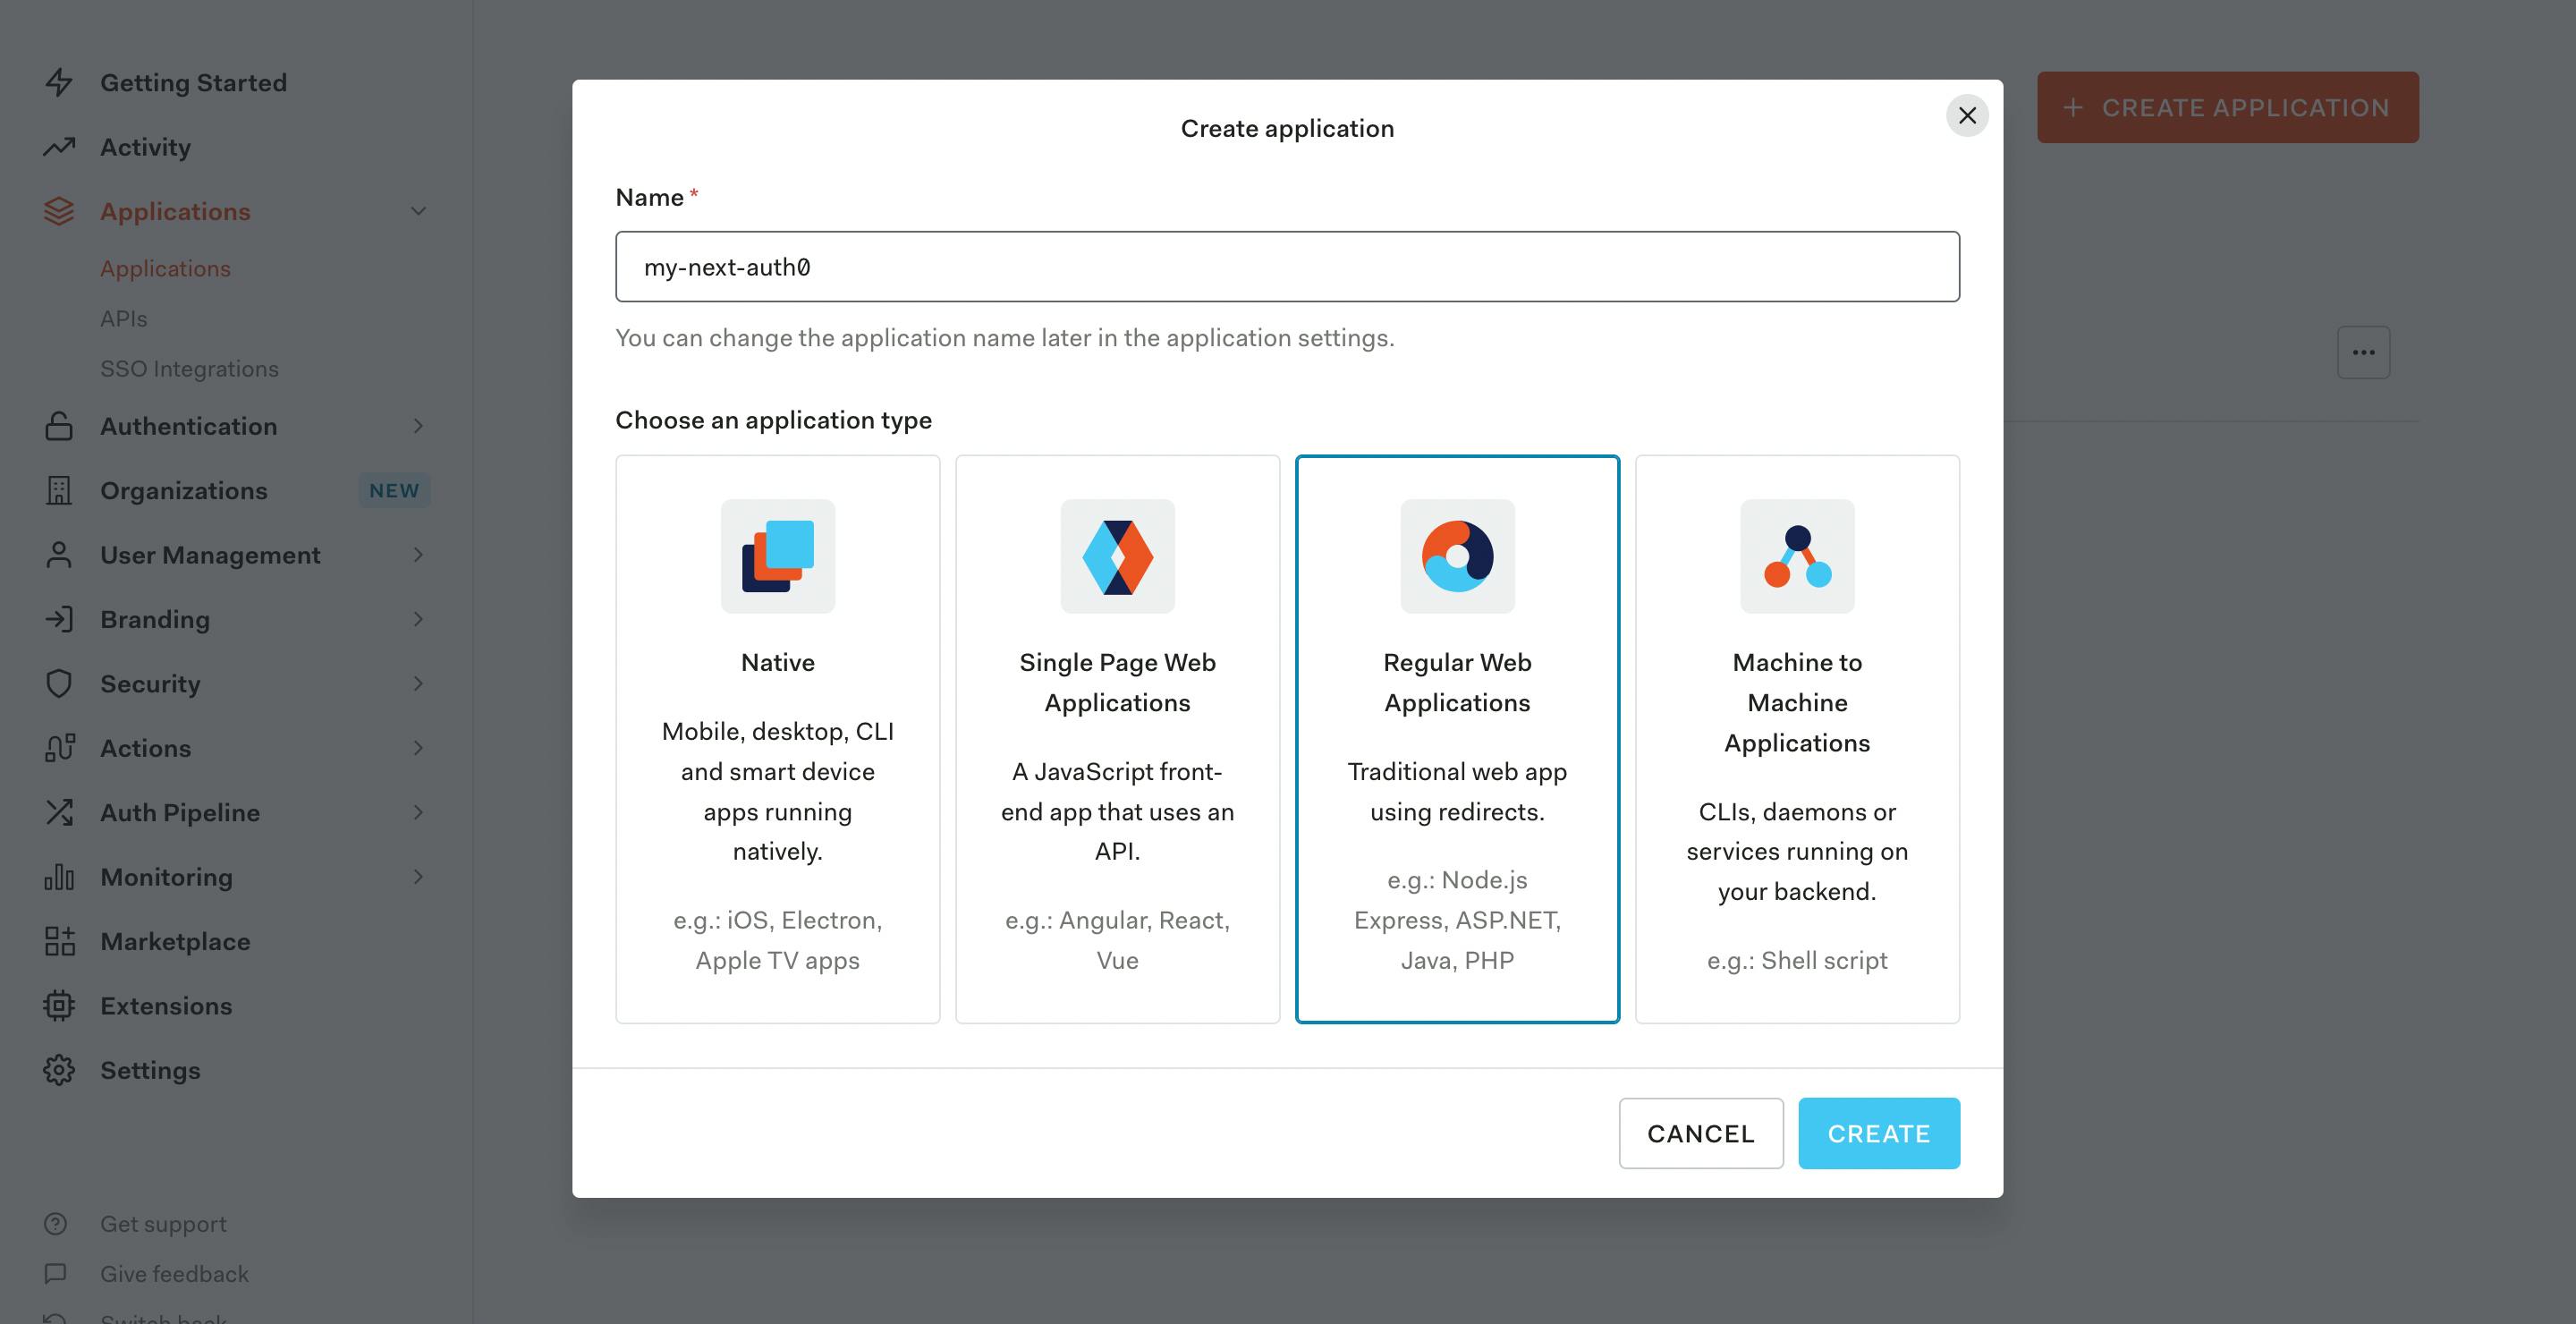
Then we are going to set up a new application in the Auth0 dashboard. Once you've logged in, navigate to the 'Applications' tab.
Click the 'Create Application' button and give the app a name. Here I name mine 'my-next-auth0'. Then select the 'Regular Web Application' option.
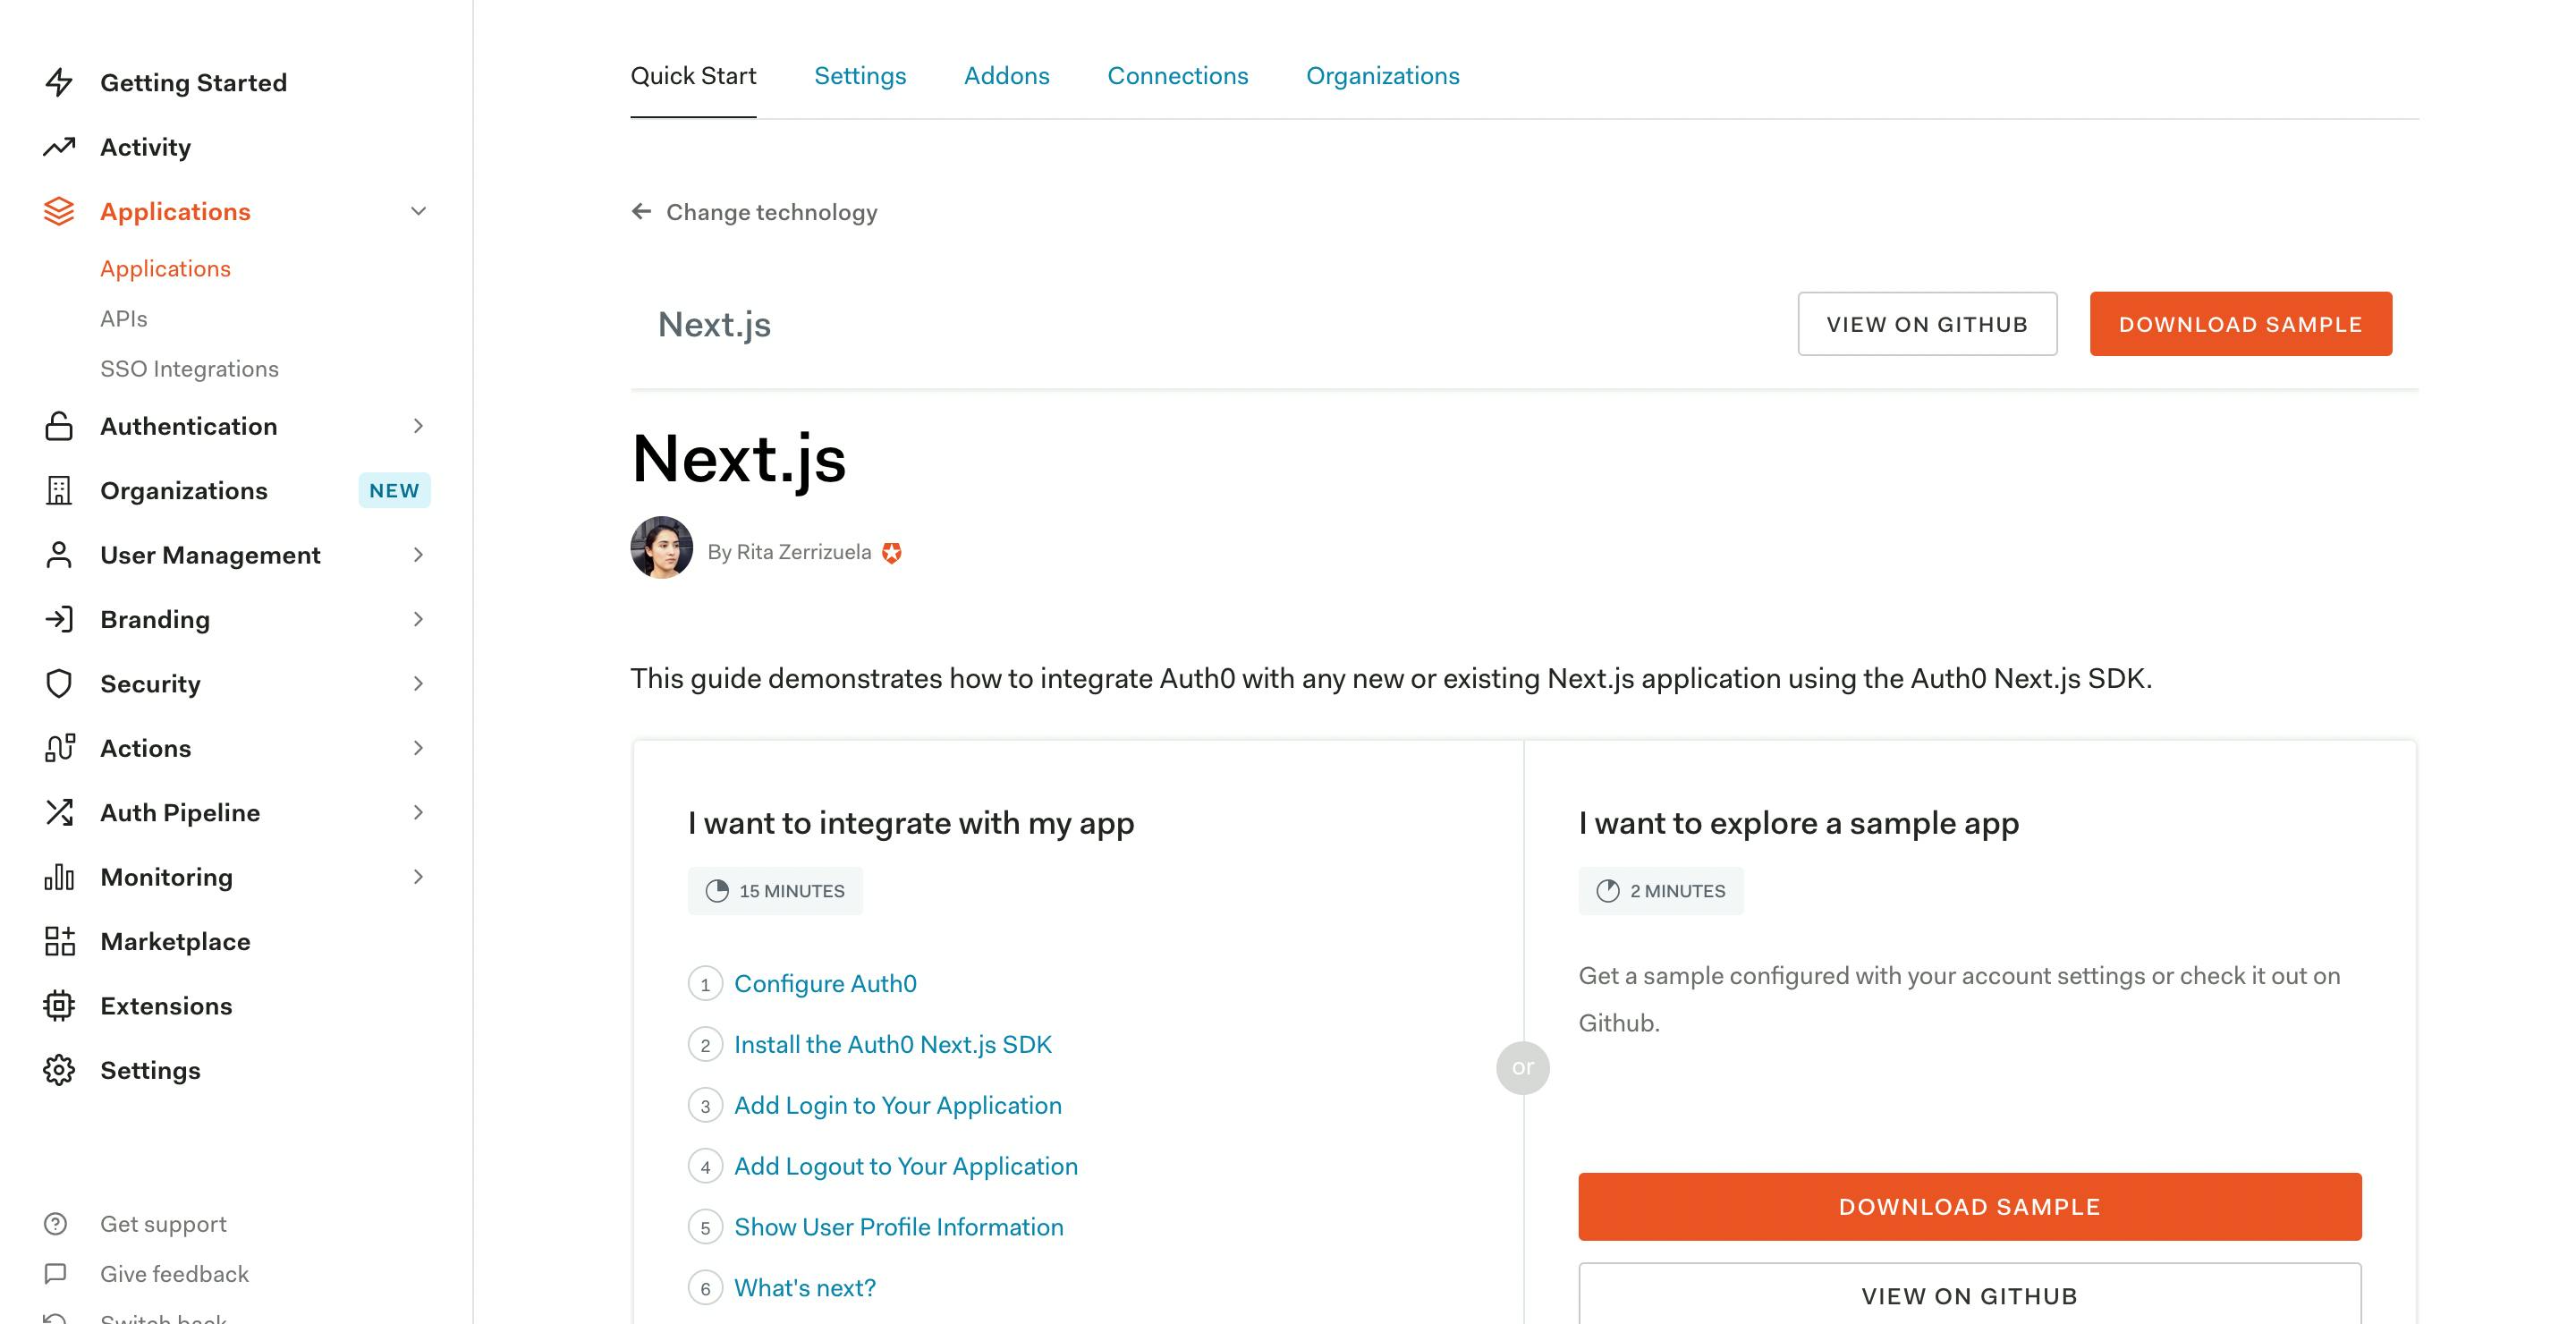
When prompted select 'Next.js' as the technology for the application. Auth0 recently had an update to their site and now offer some very helpful documentation on how to get started with Next.js and Auth0 authentication. This information is available in the 'Quick Start' tab of your application if you ever need any help.
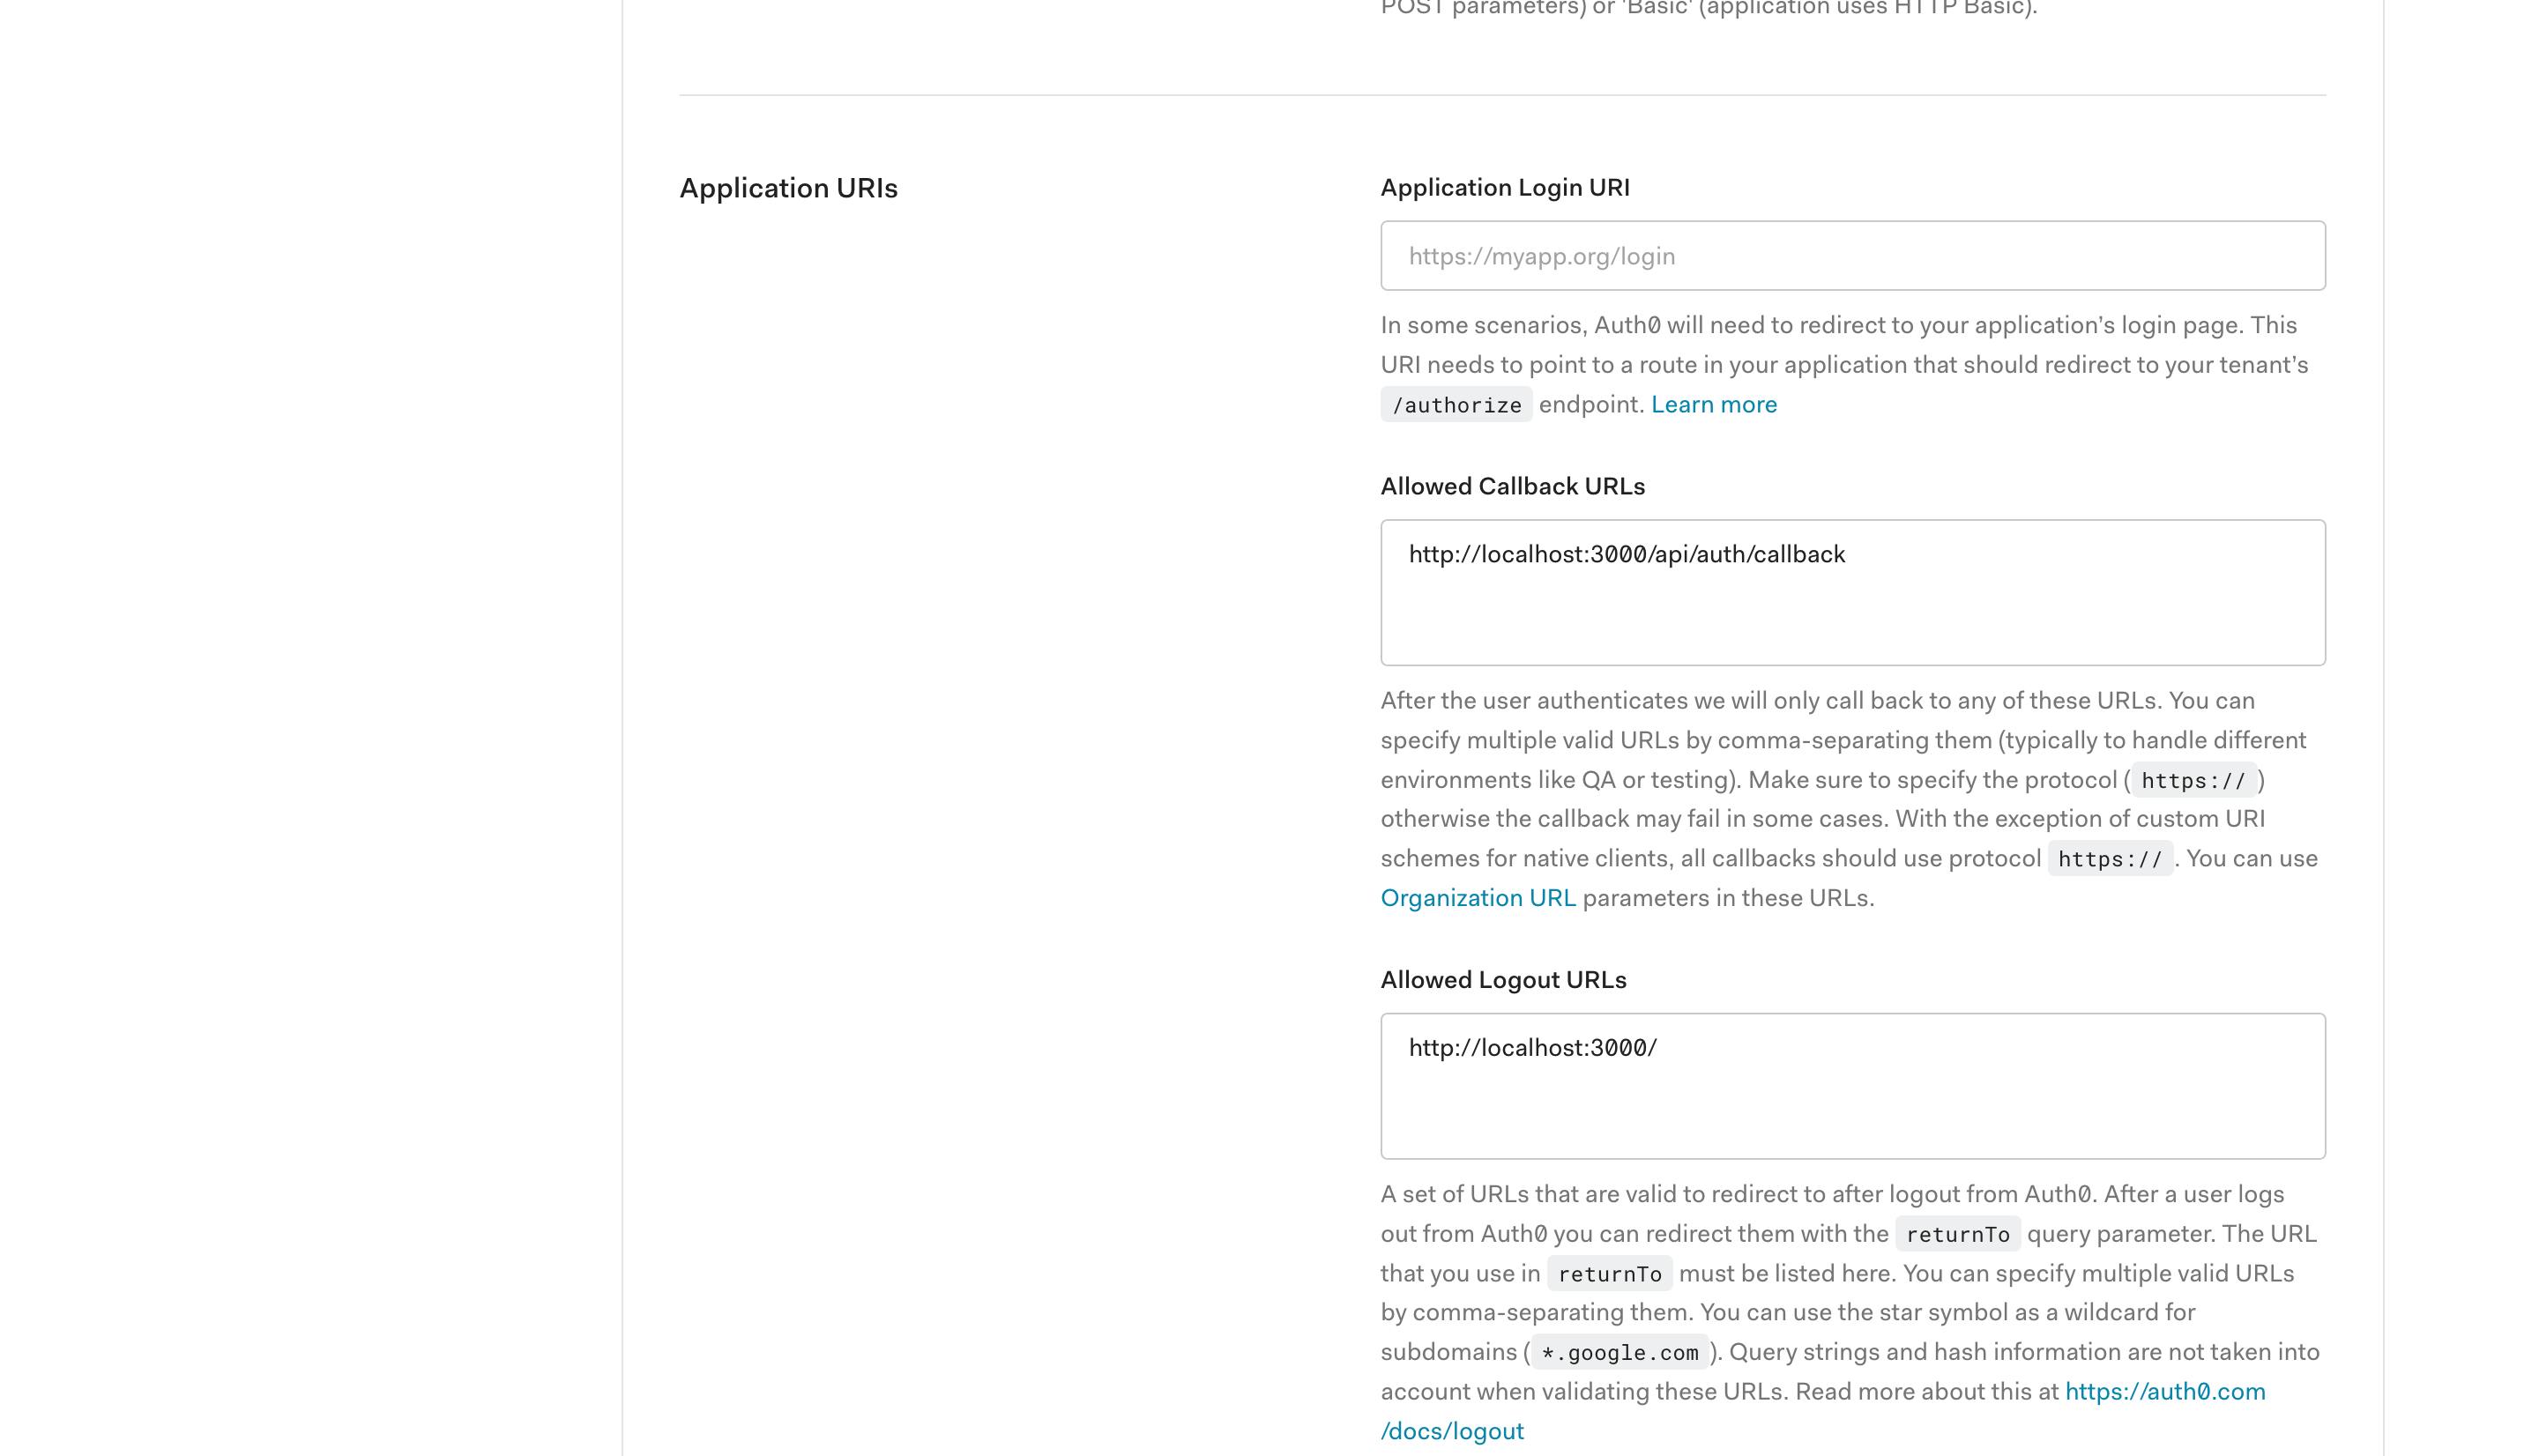
The next step is to configure some settings in our Auth0 application. Click on the 'Settings' tab and here we need to set two options.
- Allowed Callback URLs -
http://localhost:3000/api/auth/callback - Allowed Logout URLs -
http://localhost:3000/
You might choose to configure more settings depending on your app but this is enough for us. If you end up deploying the app then you would also want to come back in here and add your new URLs.
When we as a user have entered our login details successfully, Auth0 will need a destination to send the user. This is why we specify our API callback route so that our auth package can handle the redirect.
When the user hits the logout button, we also specify the url's that are valid for auth0 to redirect to for the logout case. Here it is http://localhost:3000/.
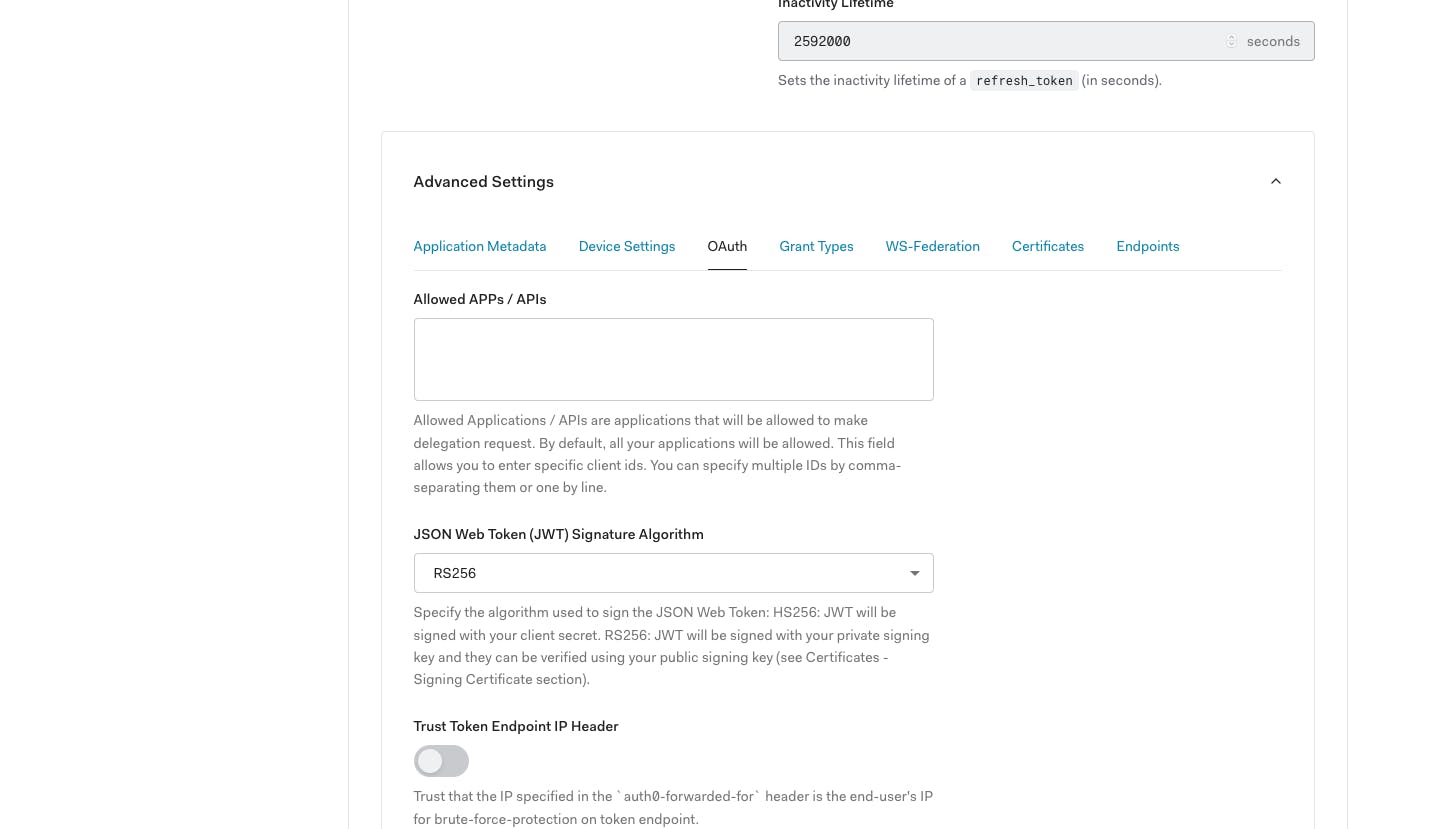
The package @auth0/nextjs-auth0 also requires the following settings within the Auth0 app dashboard so make sure to check they are correct.
- Json Web Token Signature Algorithm - RS256
- OIDC Conformant - True
You can find those settings in your applications 'Advanced Settings - OAuth'.
Now that we have our settings in place we are going to need some constants in our Next.js app which we will store in environment variables. Create a .env.local file at the root of your app:
// at the project root
touch .env.local
and add the following but replace the examples with your settings 👇
AUTH0_BASE_URL={{Base URL of your site, probably http://localhost:3000 in development}}
AUTH0_ISSUER_BASE_URL={{https://your auth app domain found in dashboard}}
AUTH0_SECRET={{Some secret used to encrypt the session cookie}}
AUTH0_DOMAIN={{https://your auth app domain found in dashboard}}
AUTH0_CLIENT_ID={{Auth0 app client id found in dashboard}}
AUTH0_CLIENT_SECRET={{Auth0 app client secret in dashboard}}
AUTH0_SCOPE={{The scopes we want to give to our authorized users, here I will use 'openid profile'}}
Our auth package will pull the following information from your.env.local file so make sure you don't miss these out and that you also name them like this 👆.
It's up to you to locate the missing information from your dashboard and add it to the .env.local file and I've added a description for each variable to help you along. These settings should be secret to your app so don't go sharing them with anyone 😉.
For the AUTH0_SECRET variable you can generate a secure secret from the command line using:
openssl rand -hex 32
Auth API route
Now our application is created and our variables are setup we can start working on the authentication flow in our Next.js app.
To do this we are going to make use of Next.js API routes. If you need a quick introduction to these routes, check out my article here Getting started with Next.js API routes.
We will need one API route to handle user authentication. Create the file pages/api/auth/[...auth0].js.
// project root
touch pages/api/auth/[...auth0].js
Using this dynamic route will match all paths prefaced by /api/auth/ meaning it will run whenever we hit one of our auth routes. The handleAuth() function which you are about to see will create the following routes for us seemingly by magic 🪄.
/api/auth/login/api/auth/callback/api/auth/logout/api/auth/me
import { handleAuth } from '@auth0/nextjs-auth0';

export default handleAuth();
We will explore how we can add some custom functionality to this later but for now that's all you need.
Auth Provider_app.js
We can access the user on the client or on the server. To access the user on the client we must wrap our app in the UserProvider component provided by @auth0/nextjs-auth0.
In our app we are going to be accessing the user on the server. Despite this, I will add the provider to the app in case something changes and we need access to the user on the client.
Inside the _app.js page you should wrap the returned content with the provider.
// _app.js
import { Global, css } from '@emotion/react';
import { UserProvider } from '@auth0/nextjs-auth0';

function MyApp({ Component, pageProps }) {
  return (
    <UserProvider>
      <Global styles={css`
        *, *::after, *::before {
          box-sizing: border-box;
          font-family: 'Gill Sans', 'Gill Sans MT', Calibri, 'Trebuchet MS', sans-serif;
          padding: 0;
          margin: 0;
        }

        a {
          text-decoration: none;
        }

        ul {
          list-style: none;
        }
      `}
      />
      <Component {...pageProps} />
    </UserProvider>
  )
}

export default MyApp
I have also added some basic global style resets which you are more than welcome to expand upon.
That is the simple setup complete for handling our user authentication. I promise that is not a joke. That's all you need! Soon we will see what else we can do but for now, our user authentication is functional!
The next step is to build out our application UI so we can show the user a login or logout link depending on whether the user is authenticated or not. We will also add some of the user's dynamic data when they are authenticated and work with protected routes.
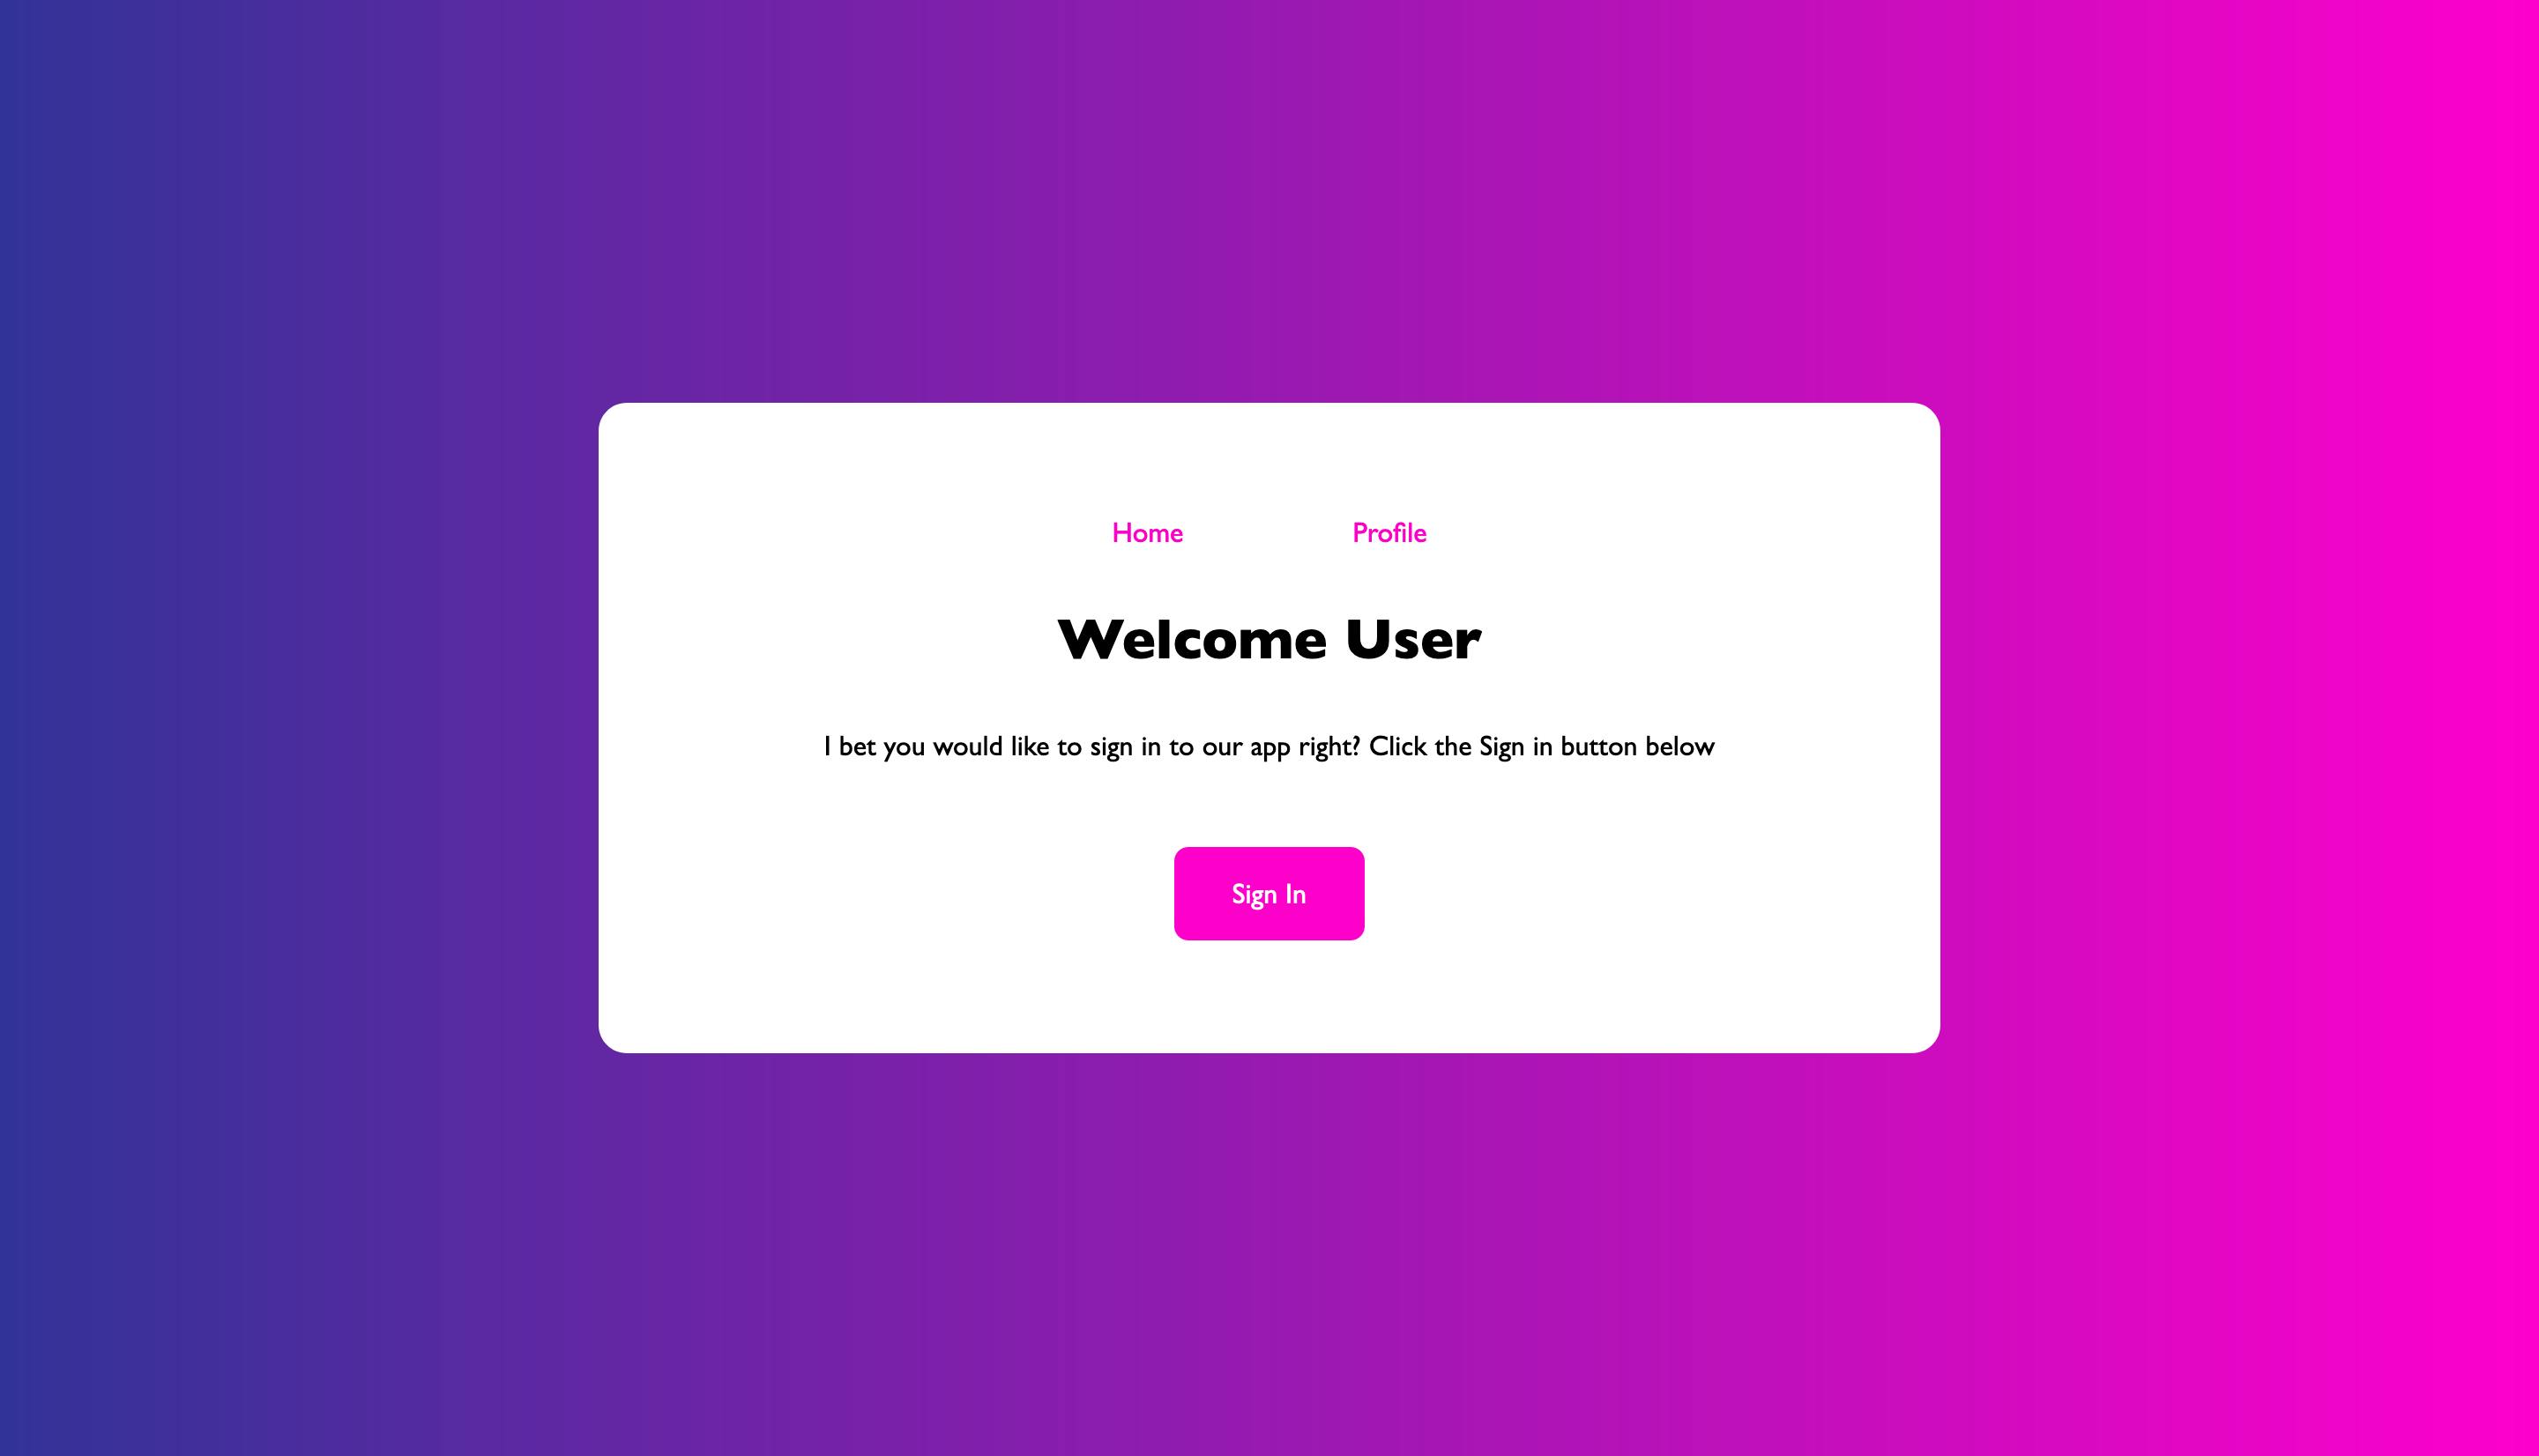
Home page
Let's start with the home page. For an unauthenticated user it will look like this👇
For an authenticated user it will look like this 👇

So let's write the code for it.
/** @jsxRuntime classic /
/** @jsx jsx */
import { css, jsx } from '@emotion/react';
import { getSession } from '@auth0/nextjs-auth0';

import AuthLink from '../components/AuthLink';
import Nav from '../components/Nav';

export default function Home({ user }) {
  return (
    <div css={css`
      align-items: center;
      background: #ff00cc;
      background: -webkit-linear-gradient(to right, #333399, #ff00cc);
      background: linear-gradient(to right, #333399, #ff00cc);
      display: flex;
      height: 100vh;
      justify-content: center;
    `}
    >
      <div css={css`
        background-color: #fff;
        border-radius: 1rem;
        padding: 4rem 8rem;
        text-align: center;
        `}
      >
        <Nav user={user} />
        <h2 css={css`
          margin: 2rem 0;
        `}
        >
          {user?.name ?? 'Welcome User'}
        </h2 >
        <p css={css`
          margin-top: 2rem;
          margin-bottom: 3rem;
        `}
        >
          {user ? `It's great to have you here${user.given_name ? ` ${user.given_name}!!` : '!!'}` : 'I bet you would like to sign in to our app right? Click the Sign in button below'}
        </p>
        <div>
          {user ?
            <AuthLink path="/api/auth/logout">Sign Out</AuthLink>
          :
            <AuthLink path="/api/auth/login">Sign In</AuthLink>
          }
        </div>
      </div>
    </div>
  )
}

export async function getServerSideProps(ctx) {
  const { req, res } = ctx;
  const session = getSession(req, res);

  return {
    props: { user: session?.user ?? null }
  }
}
As you can see it is a fairly straightforward page, but I will draw your attention to the main points.
First of all, we are pre-rendering our page on the server using getServerSideProps(). We use the helper function getSession() which takes the request and response objects as parameters and retrieves the user's current session if it exists and otherwise null. This session will contain the user data as a property on the session object.
The main reason I am server-rendering this page is to know for sure whether we have a user before rendering the page. Our user profile route which we will soon implement will be a dynamic route that will look like /profile/username. We need the user object to create this route so we pre-fetch this user on the server.
You'll also notice that I'm importing two components Nav and AuthLink in our home page. This is because we will also need the same markup for our soon-to-be Profile page so I broke it down into the reusable components that we will soon see.
useUser() hook
Another method of fetching the user with this package is through the useUser() hook. This is the method you would use if you wanted access to the user on the client and would be possible for us to implement this in our app since we previously set up the UserProvider component.
It lets us hook into the user so that the client is aware of whether or not we have an authenticated user. We can make use of loading, data, and error states to conditionally render data based on the outcomes. This is how you would implement the hook 👇.
import { useUser } from '@auth0/nextjs-auth0';

// Inside your component
const { user, error, loading } = useUser();
This does not mean authentication takes place on the client. Our authentication would still take place on the server and no sensitive information is exposed.
Nav component
This is our Nav component which is just a simple set of links with some styling 👇
/** @jsxRuntime classic /
/** @jsx jsx */
import { css, jsx } from '@emotion/react';

const linkItem = css`margin: 0 2rem;`;
const link = css`color: #ff00cc; padding: 0.5rem 1rem;`;

const Nav = ({ user }) => {
  return (
    <nav>
      <ul css={css`
        display: flex;
        justify-content: center;
        margin-bottom: 1rem;
      `}
      >
        <li css={linkItem}>
          <a css={link}
          href="/"
          >
            Home
          </a>
        </li>
        <li css={linkItem}>
          <a css={link}
          href={`/profile/${user?.nickname ?? '_'}`}
          >
            Profile
          </a>
        </li>
      </ul>
    </nav>
  )
}

export default Nav;
The component takes the user object as a prop. If the user exists, we set the route of the profile link to /profile/${user?.nickname ?? '_'}. If the user exists we have a dynamic route with the nickname of the user included. Otherwise, we set it to /profile/_ because we still have to set something otherwise we will end up on a 404 route because /profile/ does not exist. We will set up a protected route for the profile page.
AuthLink component
Our Auth Link component is the main call-to-action link for signing users in and out of our app.
/** @jsxRuntime classic /
/** @jsx jsx */
import { css, jsx } from '@emotion/react';

const AuthLinkStyles = css`
  background-color: #ff00cc;
  border: 1px solid #ff00cc;
  border-radius: 0.5rem;
  color: #fff;
  display: block;
  margin: auto;
  padding: 1rem 2rem;
  width: max-content;
`;

const AuthLink = ({ children, path }) => (
  <a css={AuthLinkStyles} href={path}>{children}</a>
);

export default AuthLink;
We can pass a dynamic path to the component props based on whether the user is authenticated.
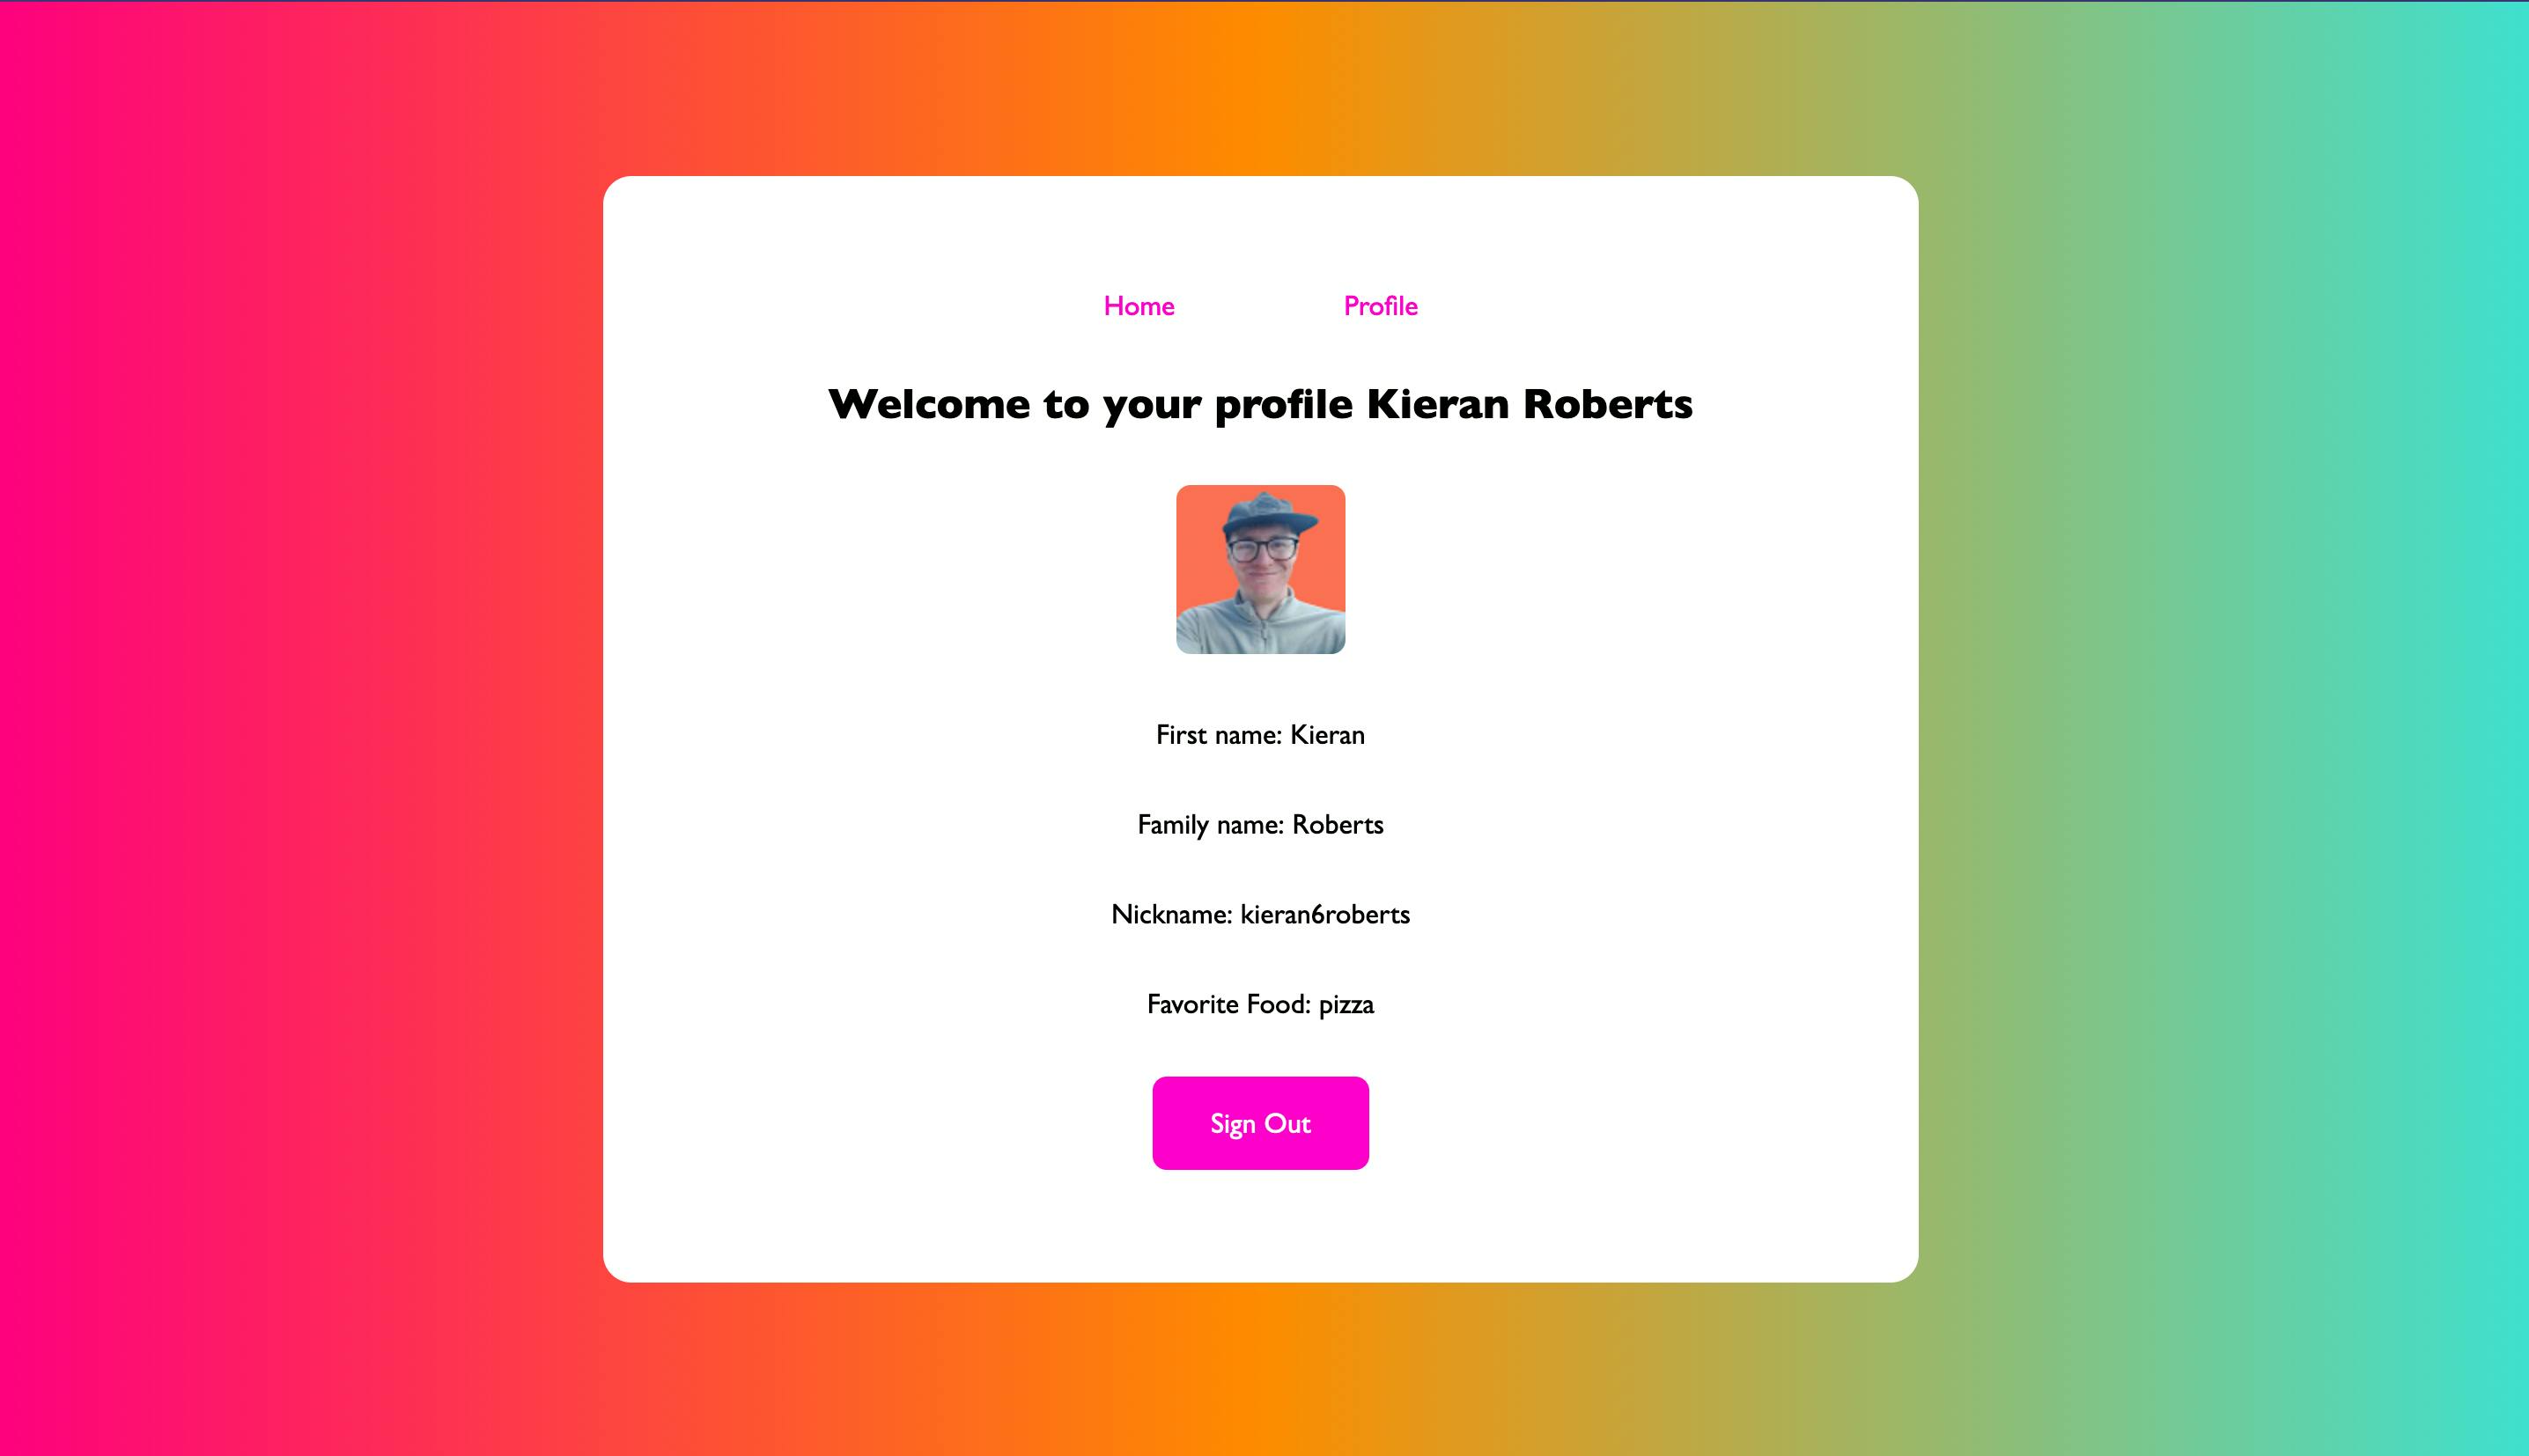
Profile page
Now I'm going to create another page at a dynamic route /profile/[profile].js and this should only be accessible to users that are logged in. If an unauthenticated user tries to access this page, they should be redirected to login instead.
Let's remind ourselves of what it looks like 👇
We can implement protected routes using a helper function provided by this package called withPageAuthRequired(). You wrap getServerSideProps() using this function to check whether we have an authenticated user, and if not they will be redirected. If the user exists, there will be an added user object inside the page props object.
Start by creating our profile page file.
// project root
touch pages/profile/[profile].js
Then add the following code 👇
/** @jsxRuntime classic /
/** @jsx jsx */
import { css, jsx } from '@emotion/react';
import { getSession, withPageAuthRequired } from "@auth0/nextjs-auth0";

import AuthLink from '../../components/AuthLink';
import Nav from '../../components/Nav';

const profileItem = css`margin: 2rem 0`;

export default function Profile({ user }) {
  return (
     <div css={css`
      align-items: center;
      background: #40E0D0;
      background: -webkit-linear-gradient(to right, #FF0080, #FF8C00, #40E0D0);
      background: linear-gradient(to right, #FF0080, #FF8C00, #40E0D0);

      display: flex;
      height: 100vh;
      justify-content: center;
    `}
    >
      <div css={css`
      background-color: #fff;
      border-radius: 1rem;
      padding: 4rem 8rem;
      text-align: center;
      `}
      >
        <Nav user={user} />
        <h2 css={css`margin: 2rem 0`}>Welcome to your profile {user.name}</h2>
        {user &&
          <img
          alt="user avatar"
          css={css`
          border-radius: 0.5rem
          `}
          src={user.picture}
          />
        }
        <ul css={css`margin-bottom: 2rem`}>
        {user.given_name ? <li css={profileItem}>First name: {user.given_name}</li> : null}
        {user.family_name ? <li css={profileItem}>Family name: {user.family_name}</li> : null}
        {user.nickname ? <li css={profileItem}>Nickname: {user.nickname}</li> : null}
        {user.favoriteFood ? <li css={profileItem}>Favorite Food: {user.favoriteFood}</li> : null}
        </ul>
        <AuthLink path="/api/auth/logout">Sign Out</AuthLink>
      </div>
    </div>
  )
}

export const getServerSideProps = withPageAuthRequired({
  async getServerSideProps(ctx) {
    const { req, res, query } = ctx;
    const { profile } = query;
    const session = getSession(req, res);

    if (profile !== session.user.nickname) {
      return {
        redirect: {
          destination: `/profile/${session.user.nickname}`,
          permanent: true
        }
      }
    }

    return {
      props: {}
    };
  }
});
We start with our server-side rendered page that we wrap in our protected route wrapper. We again access the user's session but this time we want to see whether or not the user is trying to access their own profile. In our app want to restrict users to their own profile only.
To do this we check if the session nickname of the user is the same as the nickname query accessed from the context query. If they don't match we will redirect the user back to their own page.
Note 👇
I recognize that this is not a very robust check and if you are implementing a real-world app where profile privacy is essential. If we had a database then we could ensure every user has a unique identifier to compare against but I'm not going to make this article longer than it already is 😂.
End of note
As you can see we access the user object through our page props which will be provided automatically by withPageAuthRequired().
Custom auth helpers
Remember how we earlier had only two lines of code in our API auth route? We can do a lot more in here with helpers provided by our auth package. It provides a set of handlers for each state of the authentication process. They are the following 👇
handleCallbackhandleLoginhandleLogouthandleProfile
Now I'm going to add them into our API auth route so you can see how to implement them yourself. I will also use the afterCallback function to add a custom property to our user object once authenticated.
import {
  handleAuth,
  handleCallback,
  handleLogin,
  handleLogout,
  handleProfile
} from '@auth0/nextjs-auth0';

const afterCallback = (req, res, session, state) => {
  // user is located in session
  session.user.favoriteFood = 'pizza';
  return session;
};

//Use this to store additional state for the user before they visit the Identity Provider to login.
const getLoginState = (req, loginOptions) => {
  console.log(loginOptions.authorizationParams.scope); // access scope
  return {}; // custom state value must be an object
};

// Use this to add or remove claims on session updates
const afterRefetch = (req, res, session) => {};

export default handleAuth({
  async callback(req, res) {
    try {
      await handleCallback(req, res, { afterCallback });
    } catch (err) {
        res.status(err.status ?? 500).end(err.message)
    }
  },
  async logout(req, res) {
    try {
      await handleLogout(req, res);
    } catch (err) {
        res.status(err.status ?? 500).end(err.message)
    }
  },
  async login(req, res) {
    try {
      await handleLogin(req, res, { getLoginState });
    } catch (err) {
        res.status(err.status ?? 500).end(err.message)
    }
  },
  async me(req, res) {
    try {
      await handleProfile(req, res, { afterRefetch });
    } catch (err) {
        res.status(err.status ?? 500).end(err.message)
    }
  }
});
We can call these four asynchronous functions inside our handleAuth object and in each we use our handler functions wrapped in a try/catch block. Each of the handlers has a custom set of handlers so consult the documentation if you need help.
I wanted to show that it is possible to add custom functionality to each step based on your requirements. Each time we login, we redirect to our callback function which runs our afterCallback function. In here we add a custom property called favoriteFood on our user object which is accessed through the session object.
Now you should see an extra list item with my favorite food being pizza on the profile page that we previously set up. The app should now resemble the finished app from the video earlier on. Well done 👏.
Conclusion
That brings us to the end of this demonstration of how we can add user authentication to a Next.js app using Auth0. I think you'll agree that it was a reasonably easy thing to set up. The next step might be to set up a database so you can persist users with custom accounts suited to your app.
You have any questions then contact me @Kieran6dev where I'd be more than happy to answer you.
If you made it this far congrats 🎉. Until next time friends 👋